Crigloo Doc
1. Getting Started
Thank you so much for purchasing Crigloo, your software companion for marketing. This document will guide you on how to get started and leverage the capabilities of Crigloo. Besides this document, plenty of context-based text and videos are embedded in the product. The video section of this guide also contains helpful content.
If you have questions on topics not covered in this help file, please email us at info@crigloo.com.
1.1 “Bird’s Eye” view
Crigloo, a creative igloo, is expressly designed to make advertising and marketing a breeze. To fulfill that mission, we have created an omnichannel platform that leverages the power of data and machine learning to save time and money for businesses and agencies. Crigloo simplifies marketing campaign management so that you can focus on your business!
With Crigloo you will be able to do the following and more:
- Execute the campaigns on multiple channels (search, display, social, etc)
- Define Target Audiences (fresh prospecting and retargeting)
- Design Digital Media Ads (text, image video, carousel)
- Store creatives in the media library for reuse.
- Publish social media posts.
- Manage campaign budgets manually or let Crigloo handle them automatically.
- Pause/Play campaigns at the Ad level.
- Conduct multivariate tests of campaigns.
- Capture visitor journey through inbuilt web analytics.
- Set up tracking tags for events, remarketing, and conversions.
- Create automatic UTM parameters for tracking.
- Get unified performance insights and attribution.
- Connect to any number of ad accounts.
- Manage multiple clients and brands.
The concept of client and brand are powerful features of Crigloo and are very relevant to agencies and firms with multiple marketing entities/product lines. For instance, if an agency were to provide marketing services to 50 different firms, then each client account can be maintained separately, yet be accessed from a single login by the agency. Likewise, if a business were to have multiple brands, determined based on product line or geography, Crigloo provides the ability to maintain each brand separately, yet provide the corporate entity a single view of all their brands. The following chart illustrates the structure of Crigloo based on the end use.
A. The simplest structure is for a business with a single brand.

B. Business with multiple brands
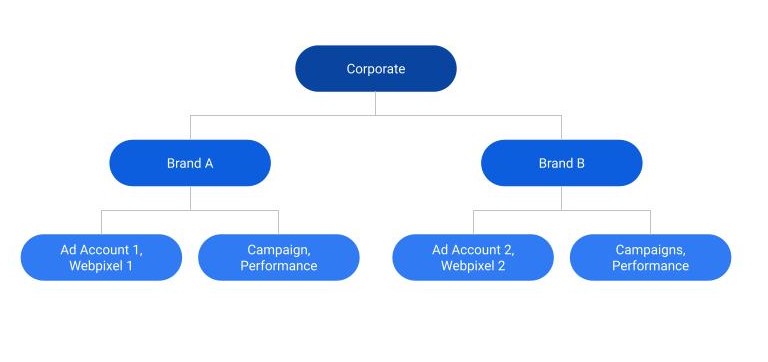
C. Agency with multiple clients with each client having one or more brands.
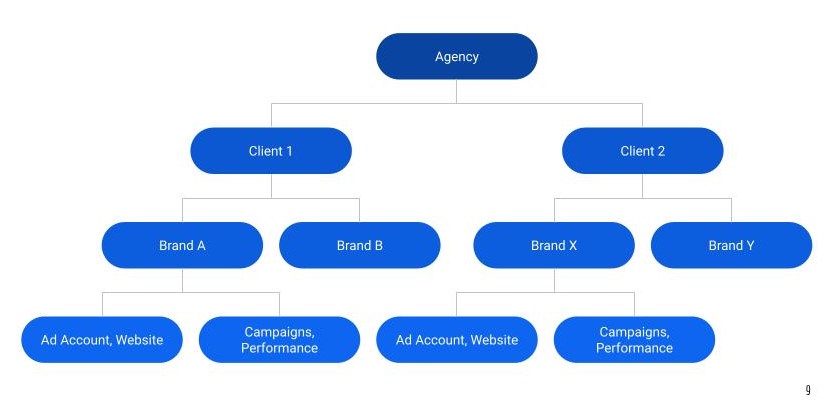
A brand can also be considered as a way to organize campaign assets into distinct buckets. Each brand's data such as those related to the advertising of a product line is stored separately. Simply put, a brand signifies a logical grouping of campaign and performance assets. For instance, if you run four campaigns promoting four brands, you should consider having four brands in Crigloo.
When you sign up with Crigloo, we automatically create the first brand based on the inputs provided on the registration page. However, you can modify the Brand configuration at any time. Please see the section on Onboarding for more information.
2. Onboarding
After you register and sign in for the first time, the Crigloo account will be set up. It can take a few moments. Please do not navigate away from the screen while the setup is underway.
Loading Screen
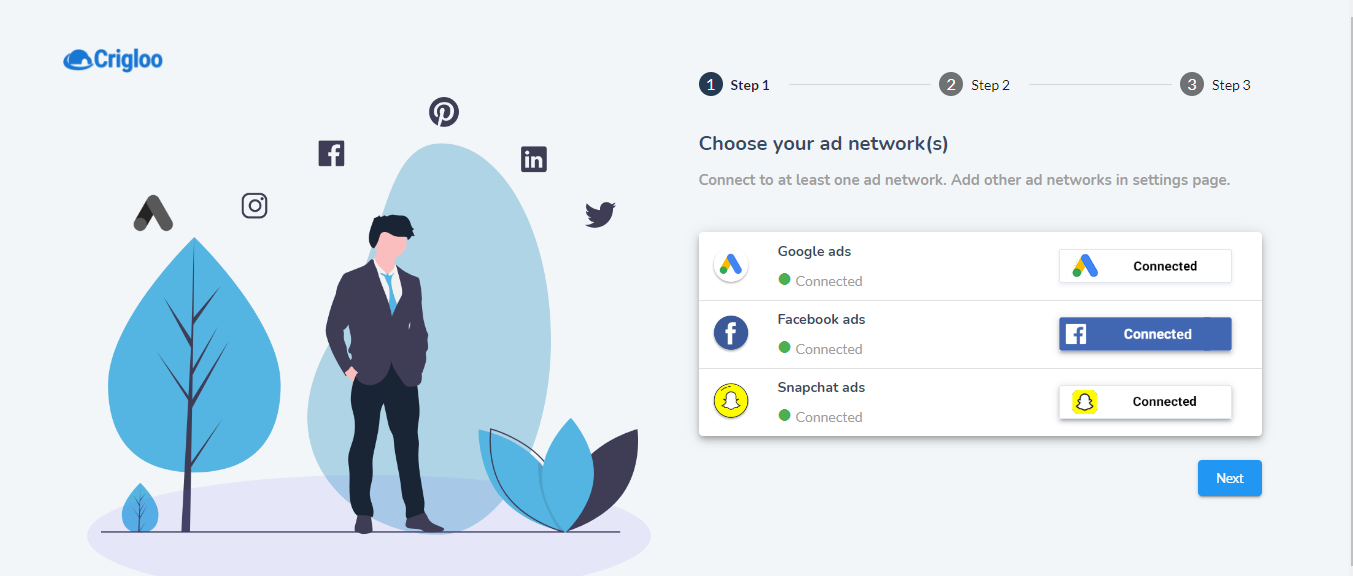
Once the account setup is complete, you will be asked to connect your Crigloo account with your ad accounts. If you choose to skip the onboarding steps, you can do the configuration later from the settings screen.
There are three items first-time users need to complete:
- At least connect to one of the following: Google, Facebook, and Snapchat accounts.
- Select one of the ad accounts: Google, Facebook, Snapchat.
- Connect to Google Tag manager
To continue connecting with your Google and Facebook accounts proceed to the next step. The steps involve obtaining an ad account from one or more ad networks such as Google, Facebook, and others. If you are an agency, connect using your manager account for Google (MCC) and Facebook (Business Manager).
Ad Account Screen
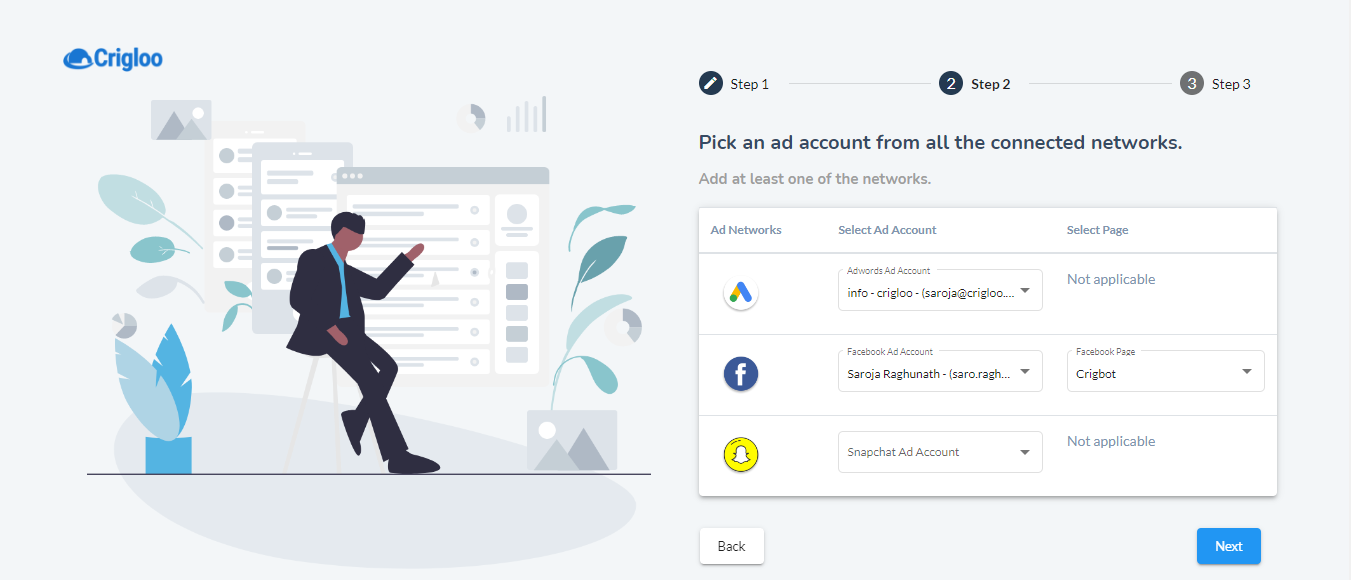
Next, pick the ad account that you want to use.
Pick Ad Account Screen
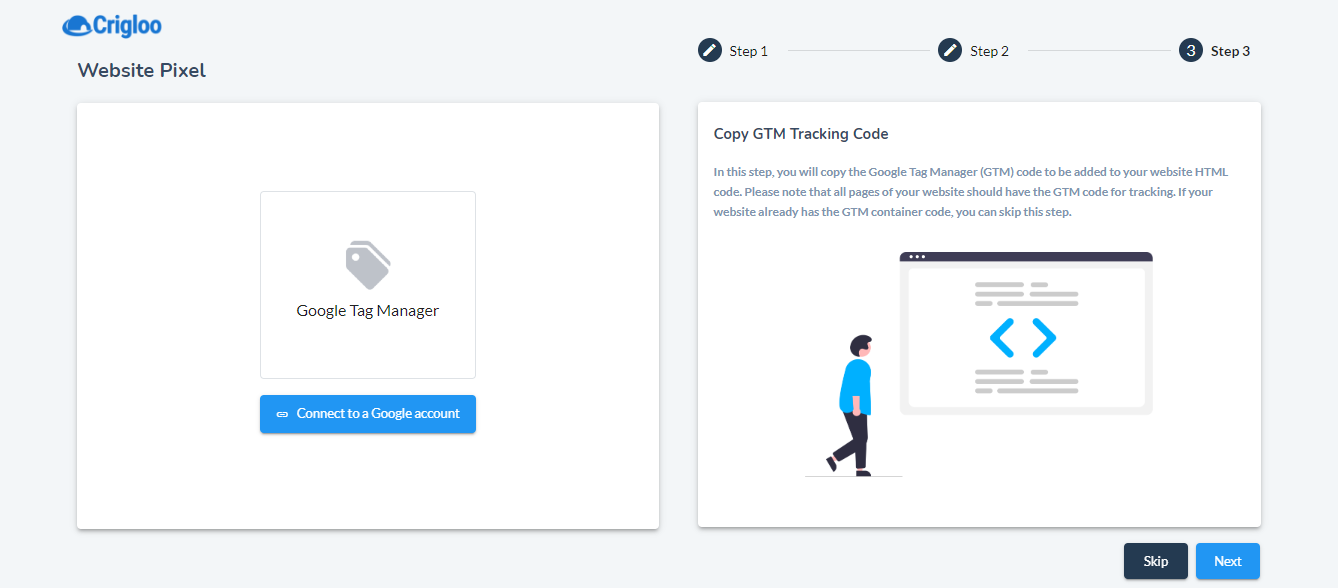
The next screen sets up your website for performance measurement and retargeting.
Firstly, let us discuss a business scenario and then discuss website pixel as part of this exercise. Imagine you are an eCommerce platform or any website wanting to track the journey of visitors to your platform. In your web portal, you have many buttons, weblinks, and other elements that comprise your online store.
As a marketer, you are keenly interested in tracking which visitors clicked key elements of the website and understand the full customer journey and funnel analytics. Google Tag manager coupled with internally developed tools allows you to track every visitor that is on your website and the full journey of the customer. Such a rich source of information will allow you to remarket to visitors and other engagement-enhancing and conversion-boosting activities.
Website Pixel Screen
At the final step of the onboarding, the first brand will be created. The brand will be created with the name of your website that you provided in the registration form.
(A brand in Crigloo signifies a logical grouping of campaign and performance assets. For most parts, a Crigloo brand can be considered a brand in your organization. For every brand in your organization, one brand in Crigloo has to be set up. Crigloo allows the creation of multiple brands. If your organization has only one brand, then you will just need one brand in Crigloo.)
Once all onboarding steps are completed, you will be presented with the following screen. To learn about navigation inside the product, please proceed to section #3 - Product Navigation
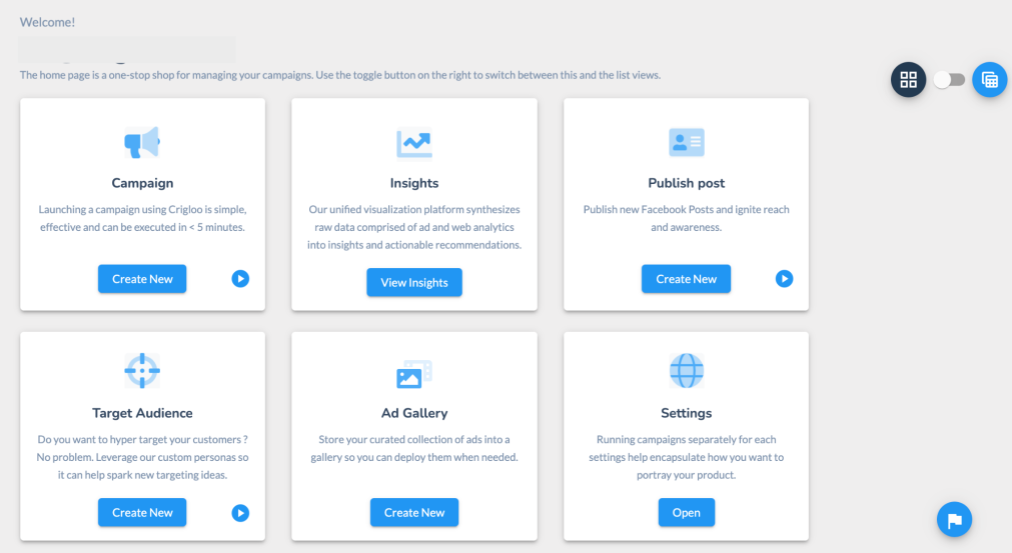
3.1 Home Page
The home page of Crigloo contains the following navigation options. From here different parts of the application can be accessed.
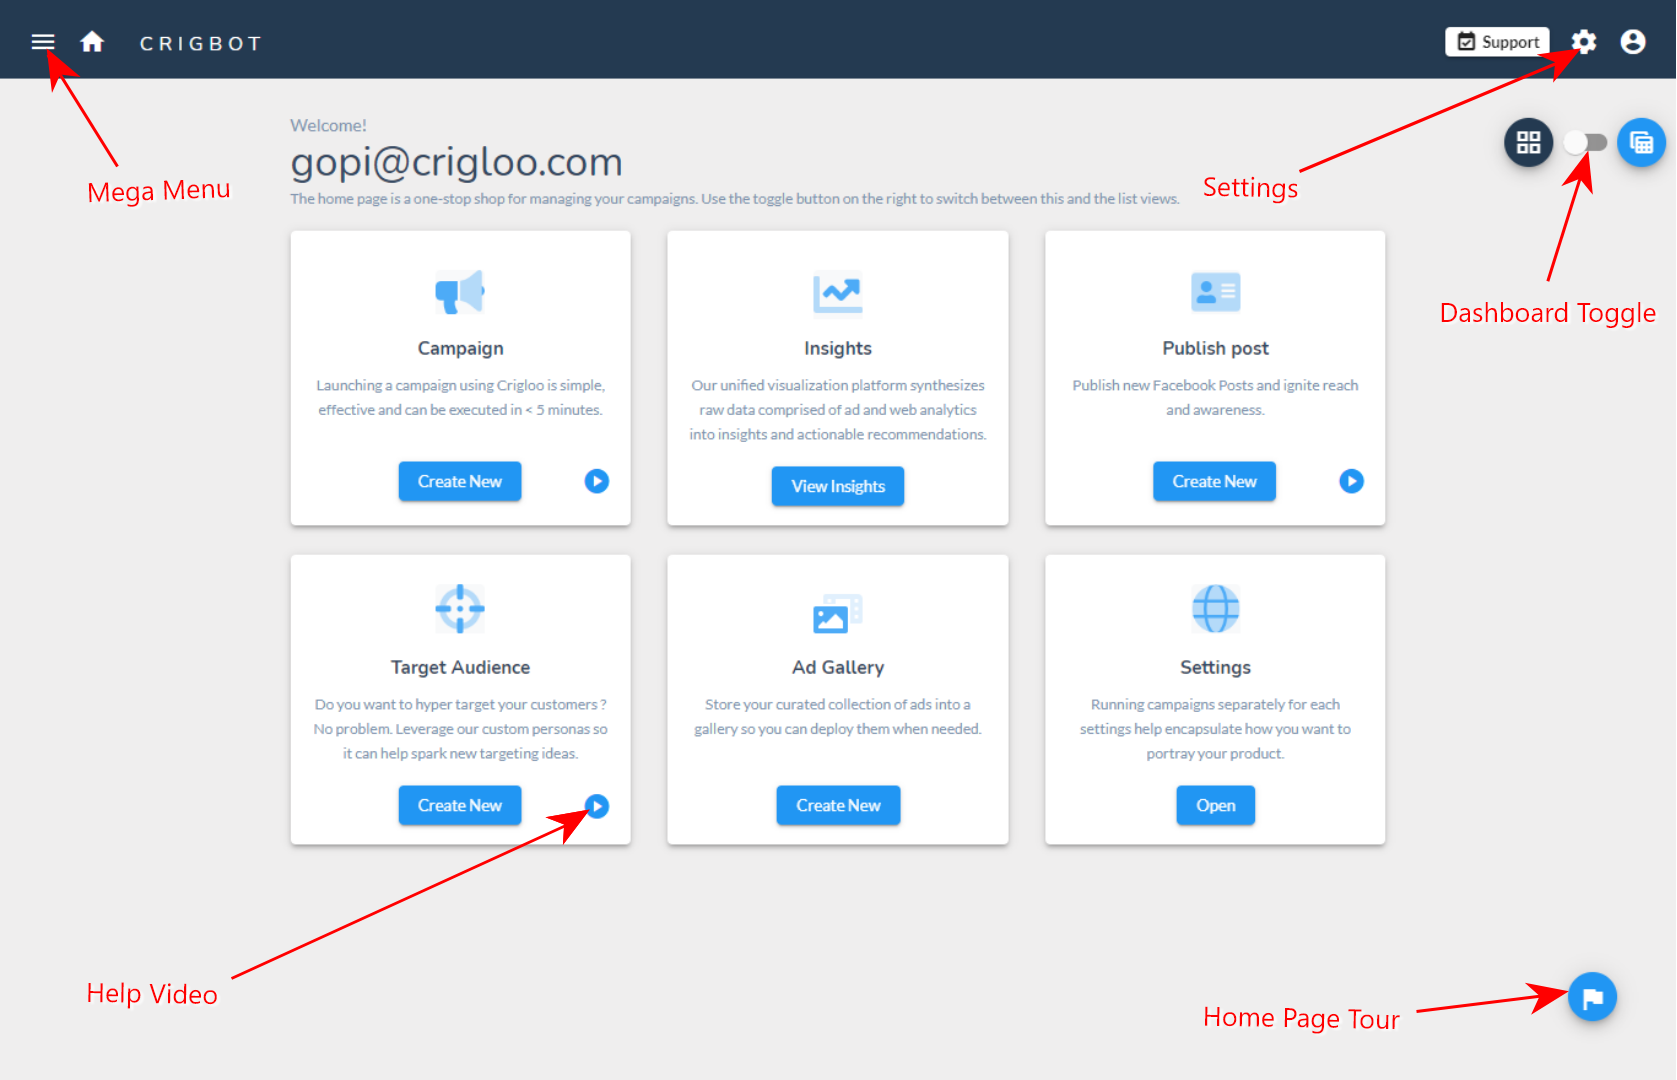
The Mega Menu provides another path to navigate the application.
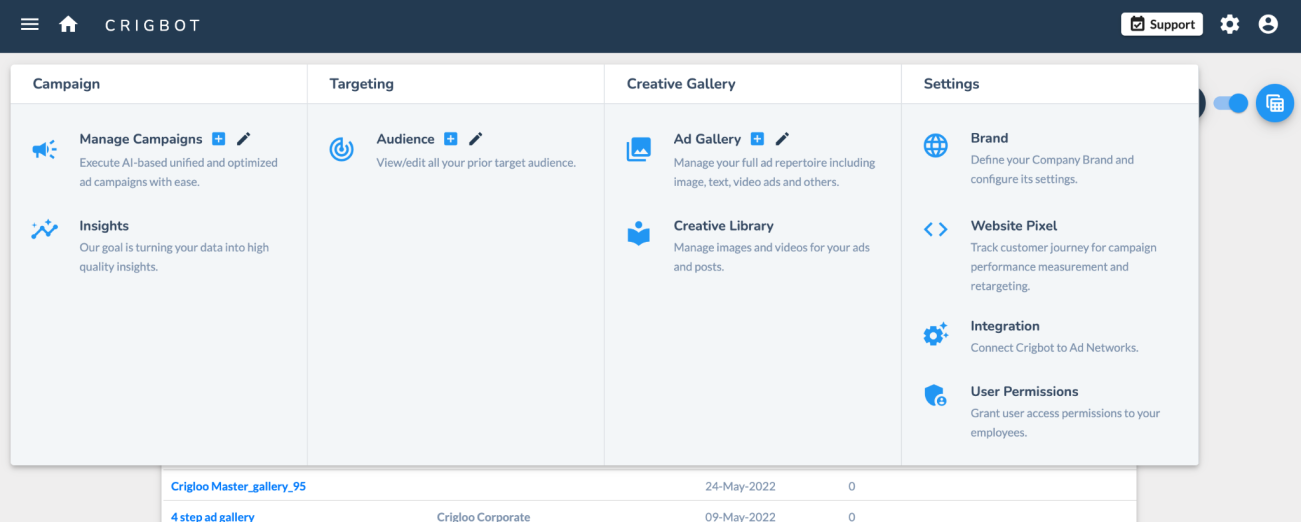
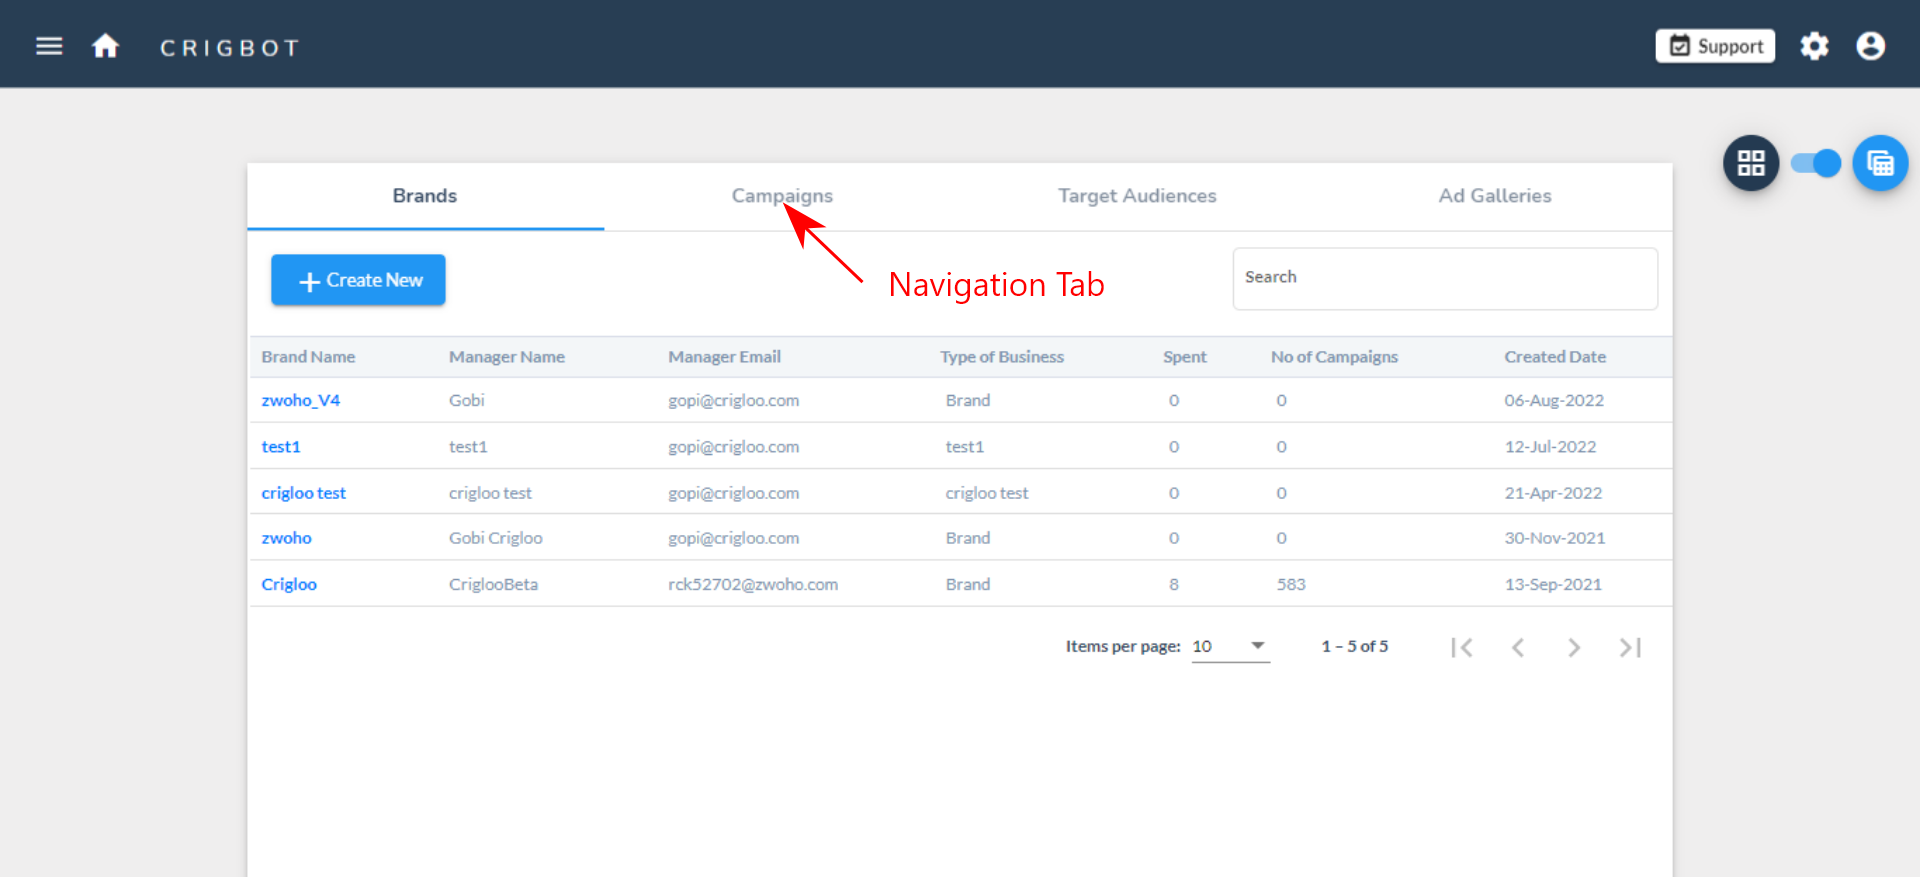
The Dashboard Toggle switch presents a grid view of the application with various metrics. There are four tabs one each for Brands, Campaigns, Target Audiences, and Ad Galleries.
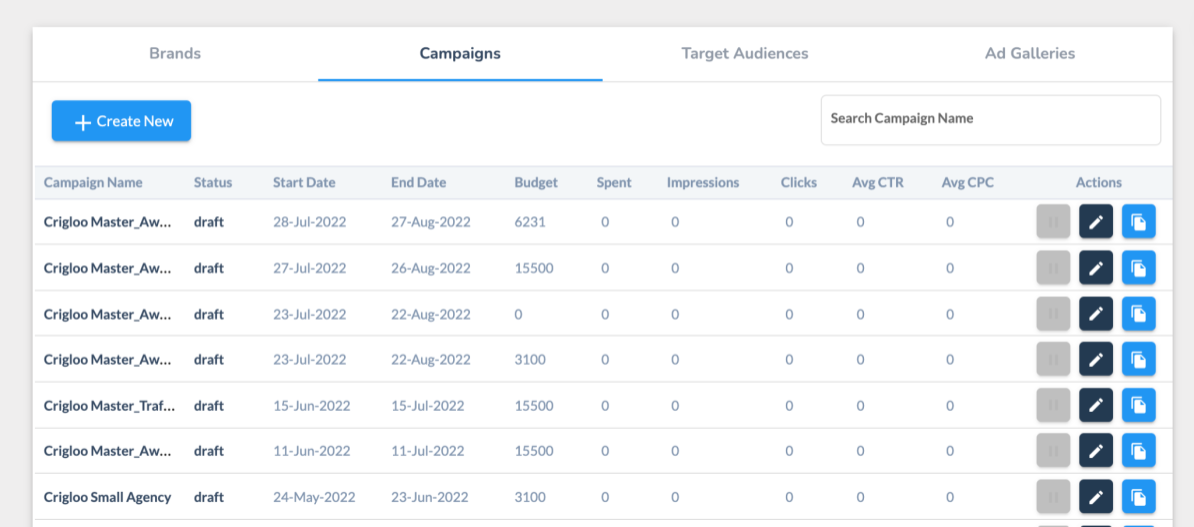
The above is the Campaign tab providing a quick overview of all campaigns launched from Crigloo.
4. Help - Campaign Creation
Launching a digital campaign in Crigloo is very easy. It involves four steps.
4.1 Prerequisites to be completed:
There are some setups to be performed before a Campaign can be launched from Crigloo:
- Configuring the Brand 5.1 Prerequisites
- Configuring the Website Pixel 5.2 Brand Configuration
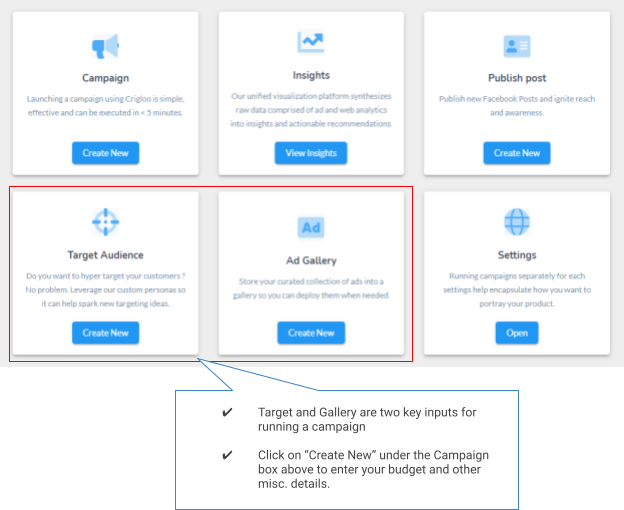
4.2 Crigloo’s Six-Pack
Broadly speaking, there are three key inputs required to run a campaign: Target audience; Gallery, a collection of your ad creatives; and Financials and other misc. items. Once you log in to Crigloo, you will land on this page below. Let’s use a picture to speed up your understanding.
Key inputs for running an ad campaign

4.3 Steps for launching a Campaign:
Step 1:

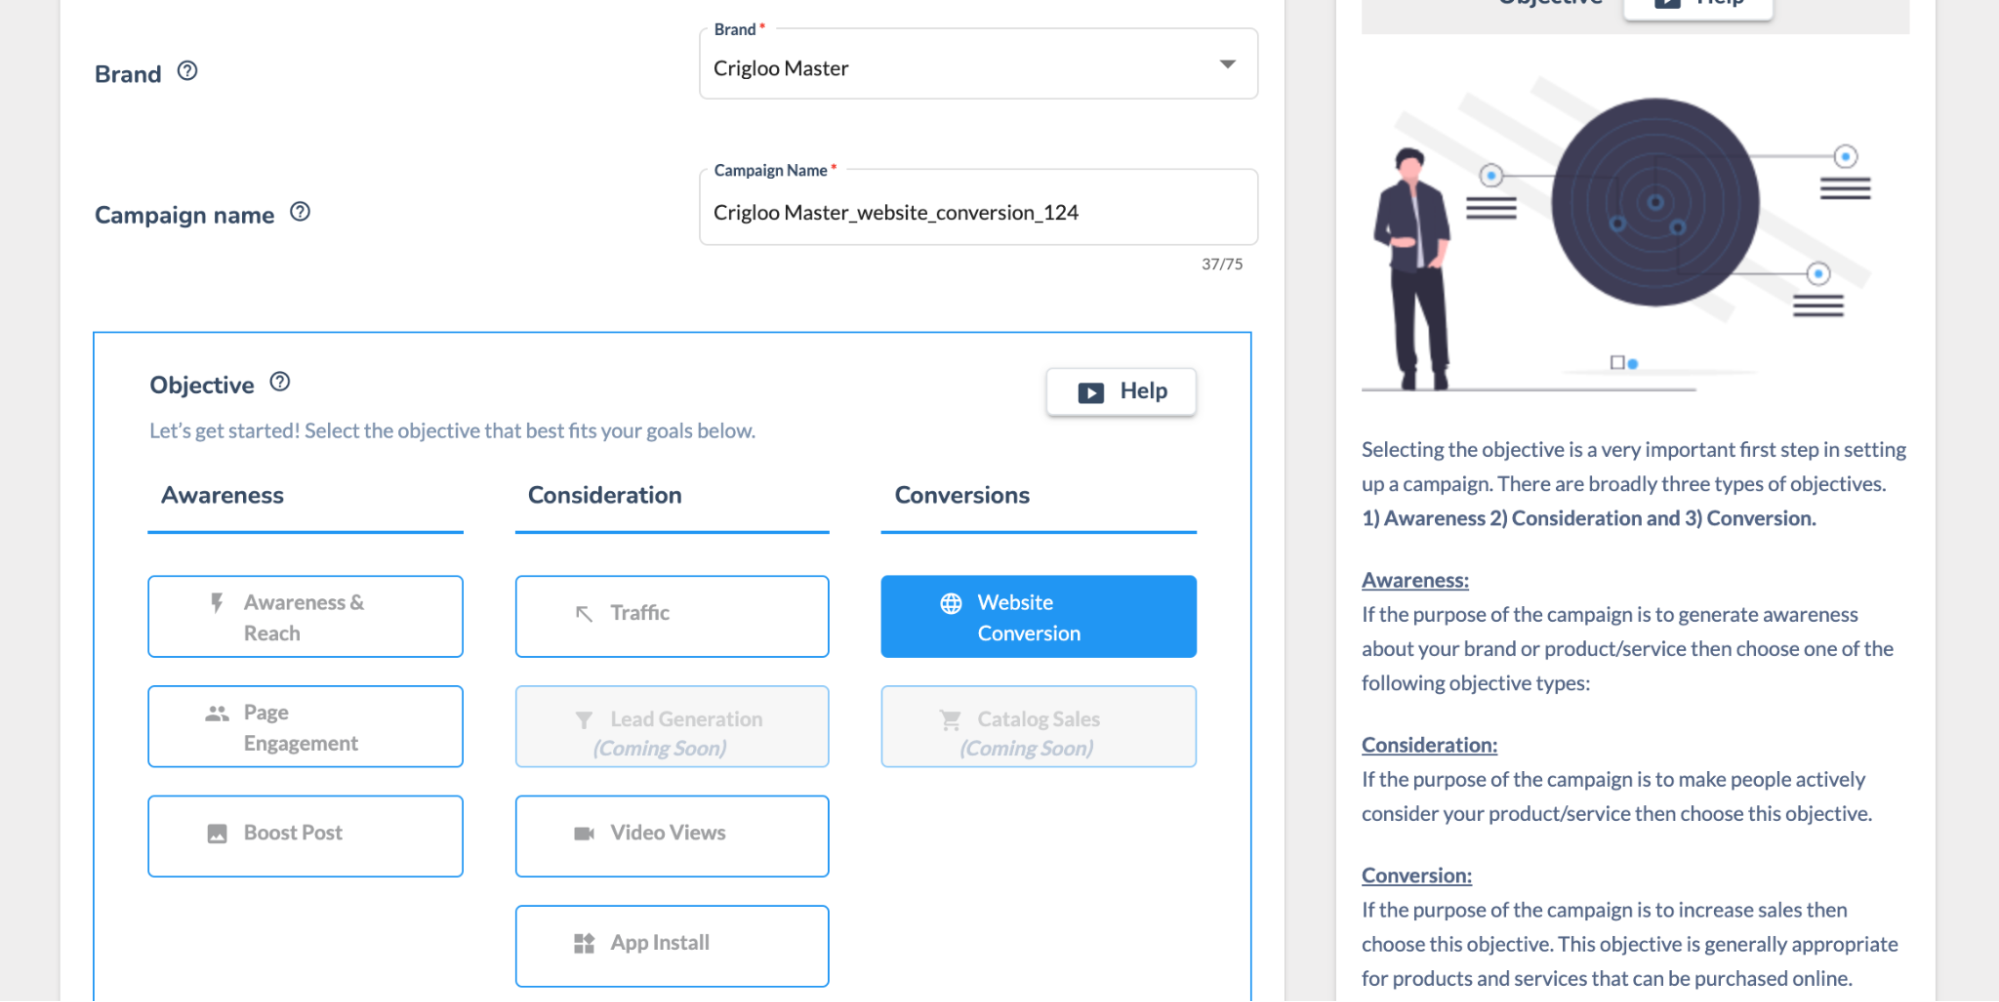
- Brand: Select a brand. Campaigns can be published only for active brands.
- Campaign Name: Give a name to the campaign.
- Objective: Select the campaign objective:
- Awareness: If the purpose of the campaign is to create awareness about your product or service. Awareness is usually measured in terms of the number of people your campaign was able to reach through ad impressions.
- Consideration: If the campaign's purpose is to generate consideration and leads. Consideration/leads are generally measured in terms of actions taken by the target audience, such as form fill, download, and some types of user engagement.
- Conversion: If the objective is to generate sales for products or services that are sold via your website. Conversion is measured in terms of revenue generated, online signups, etc.
Step 2:
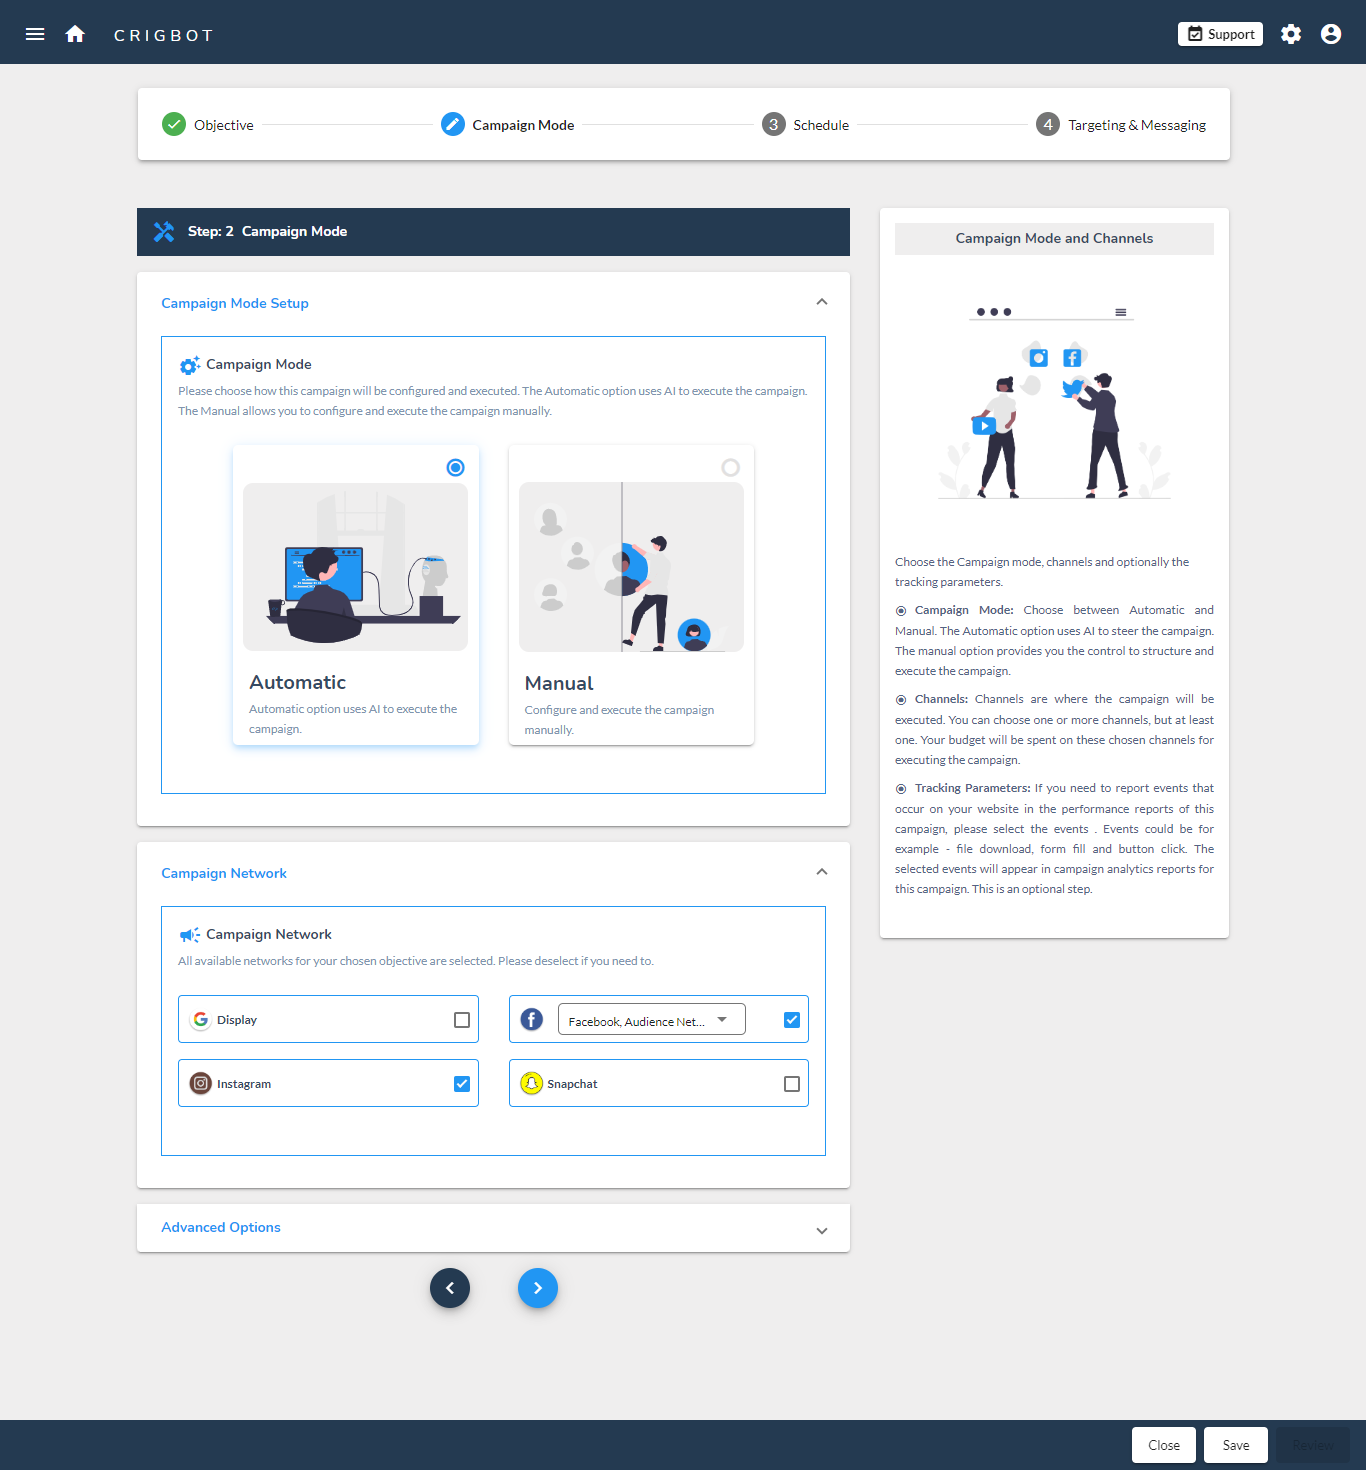
- Campaign Mode: There are two modes of running campaigns.
- Automatic: The automatic mode requires very little user input and uses AI algorithms to execute the campaign. The automatic mode is useful if the campaign is run on more than one ad network.
- Manual: The manual method provides more control over the configuration of the campaign.
- Campaign Network: Crigloo gives you the ability to run campaigns on several networks at the same time. In the step, choose the networks where the campaign should be run. You can choose one or more networks.
- Web Analytics Performance: Optionally, you choose the website events which should be included in campaign analytics. You can choose different events for different campaigns. Website events are created in the Website Pixel settings screen. Please note that the events and goals selected here are not used by conversion campaigns. This setting is used for reporting only.
Step 3:
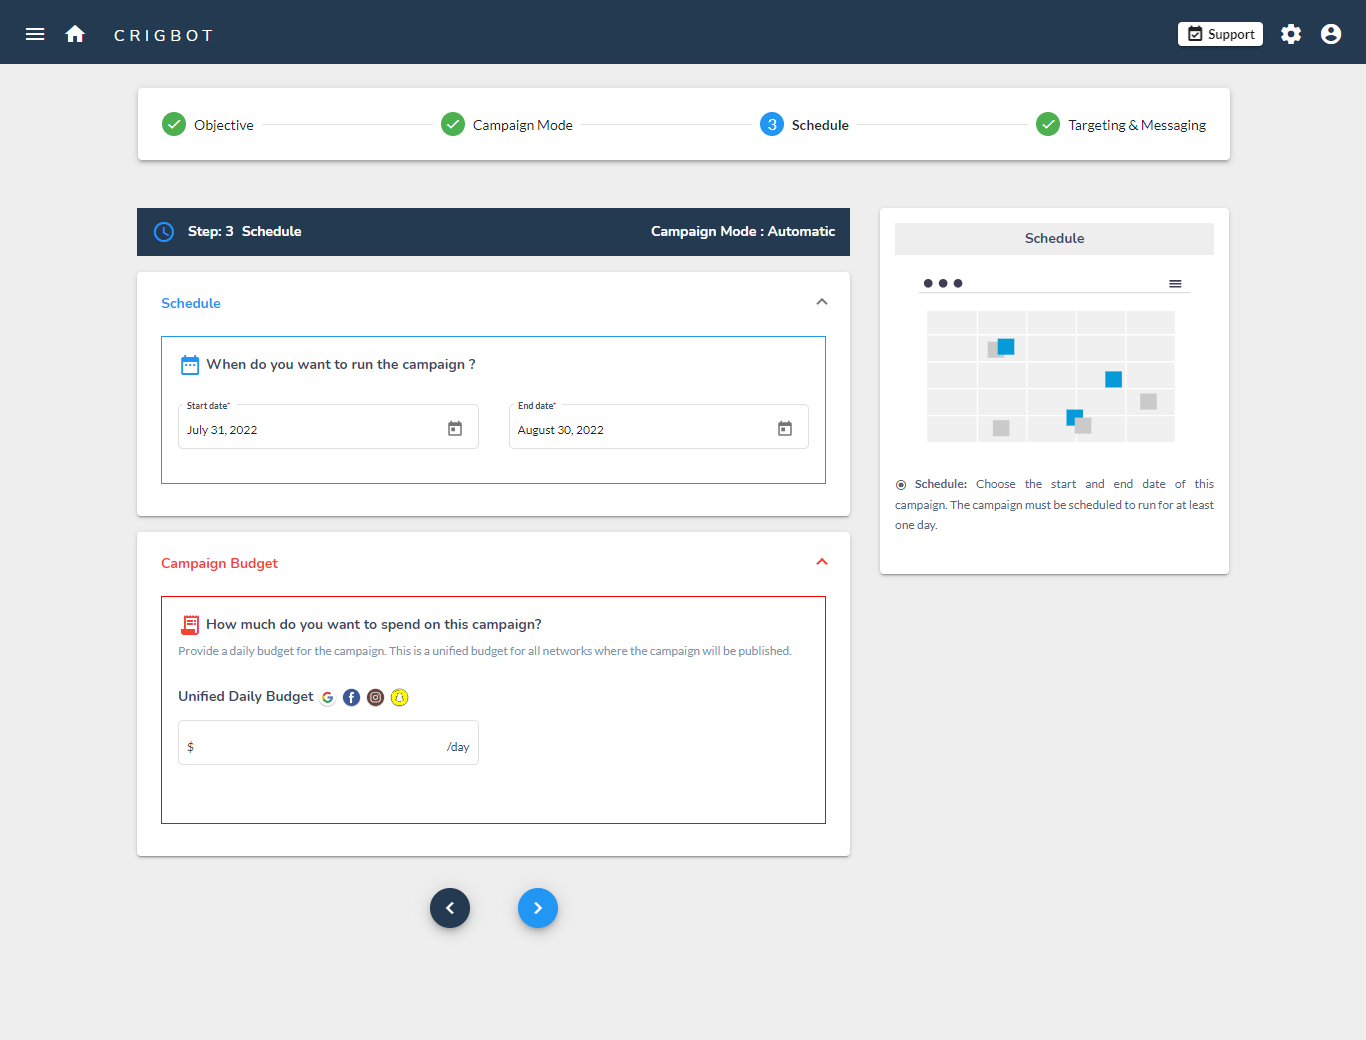
- Schedule: Choose a start date and end date for your campaign. Please note that the duration of the campaign has an impact on the performance of the campaign. Very short-duration campaigns may or may not yield good results.
- Conversion Goal (Applicable only for Conversion Campaigns): If a campaign objective is set to Website Conversion, then specific conversion goals have to be provided for each selected network. Goals are a collection of events that are triggered by visitor action on a website. Events for example be button click and element visibility. Then the collection of related events form a goal for example Purchase, Add to Cart, etc.
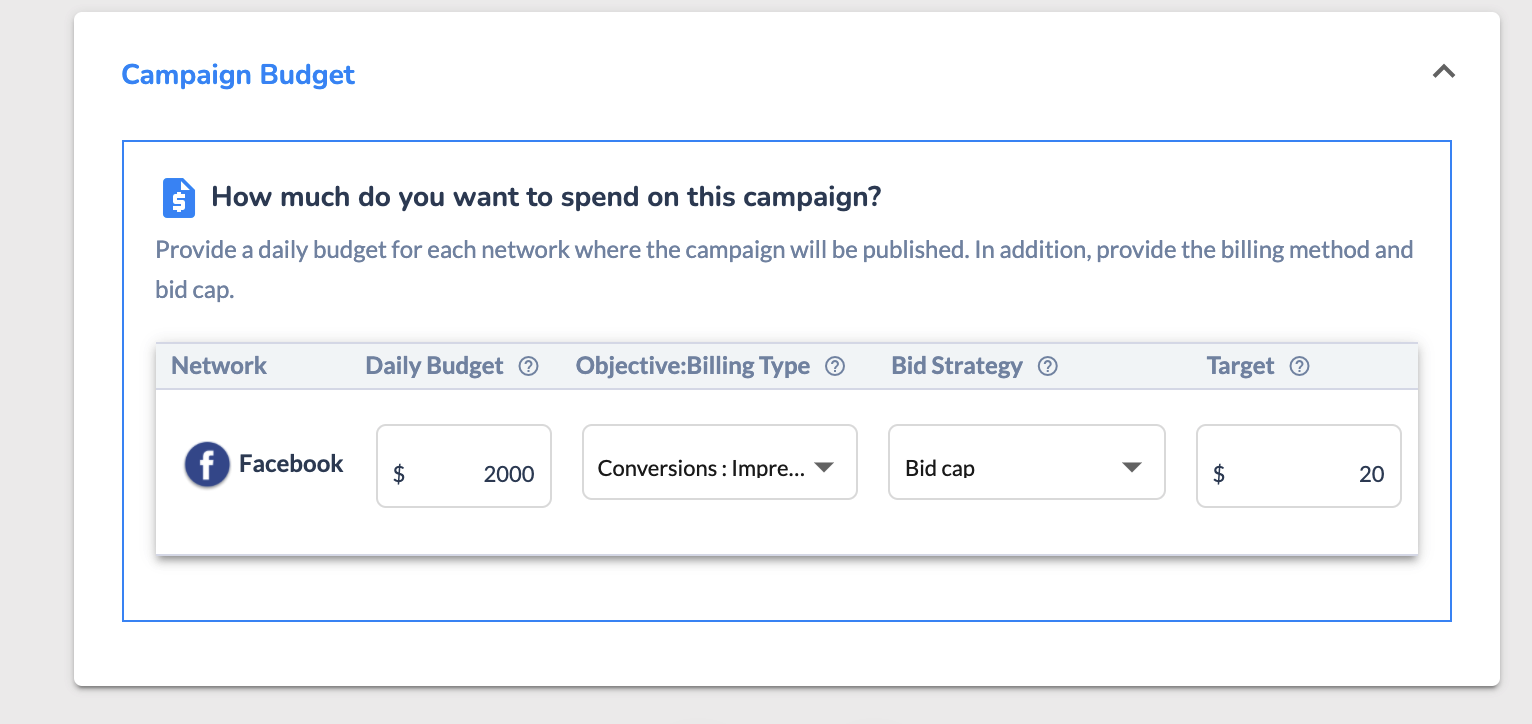
- Campaign Budget:
- Automatic mode: For campaigns in automatic mode, only a single unified budget needs to be provided. Crigloo will allocate the budget dynamically based on the performance of each network.
- Manual mode: For campaigns in manual mode, a budget for each network has to be provided. Besides billing type, bid strategy and target bid have to be given as inputs. A good understanding of the bid strategy of each network is essential to making an informed selection.
Step 4:
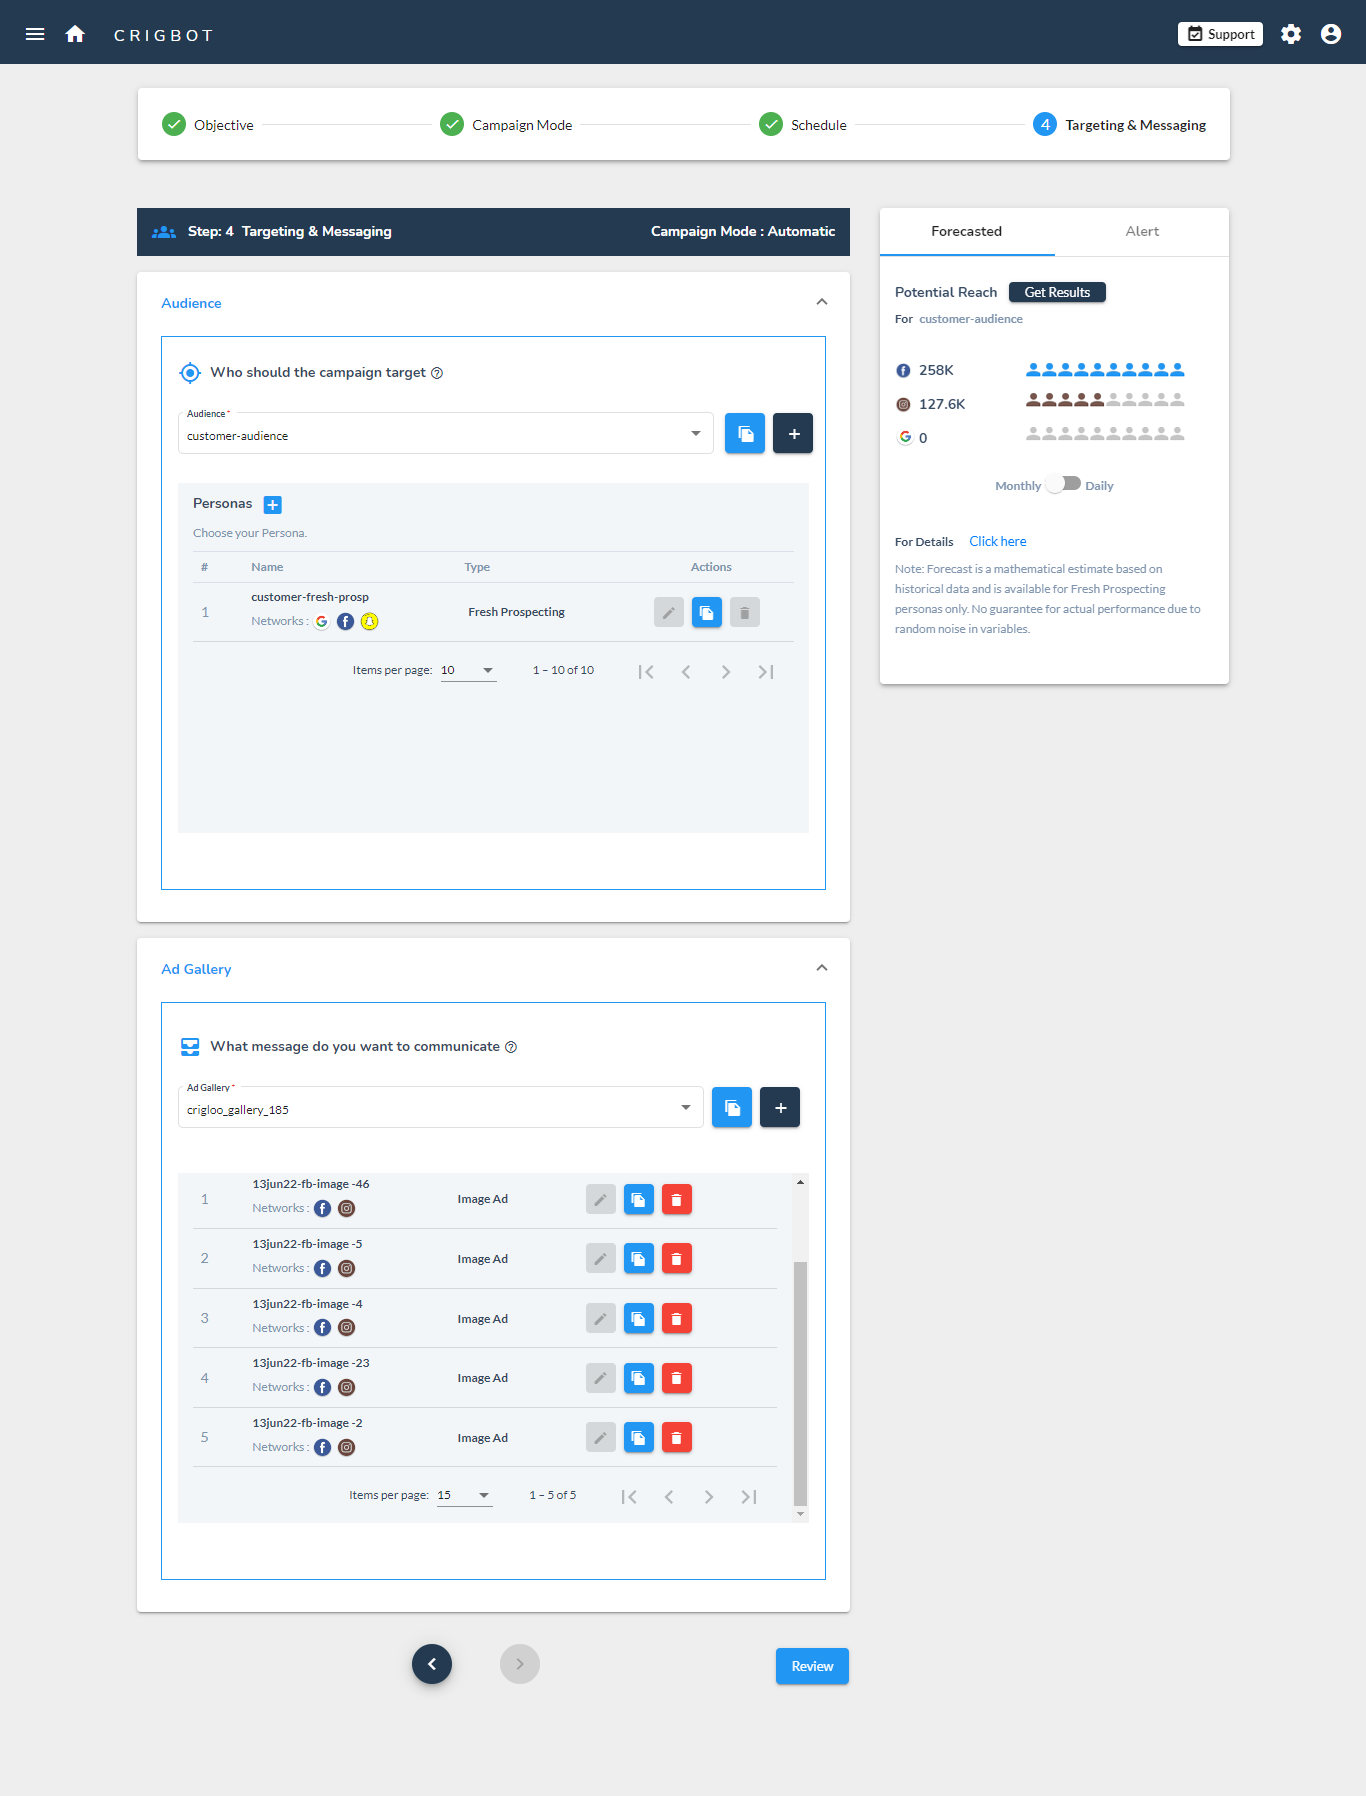
- Audience: In this step, the target audience is selected. In Crigloo, Audience is a collection of Personas. An audience can have one or more personas with each persona defining the intended target. Broadly, two types of personas can be created.
- Fresh prospecting: To find a new audience, a fresh prospecting persona is used. A new persona definition includes geographic, demographic, psychographic, and behavioral characteristics.
- Retargeting: People who have earlier engaged with the brand can also be targeted using the remarketing audience.
- Ad Gallery: In this step, an Ad Gallery is selected. Similar to the hierarchy of Audiences, a collection of digital ads in Crigloo is called a Gallery. A gallery can have one or more ads. Crigloo supports multiple types of digital ads such as Text, Display, Video, Carousel, and Story for various networks.
- This is the final step of the campaign. When the review button is clicked, the system checks the campaign inputs for errors. If errors are found they are listed in the review screen for user action. If no errors are found, details of the unified campaign that will be published will be presented.
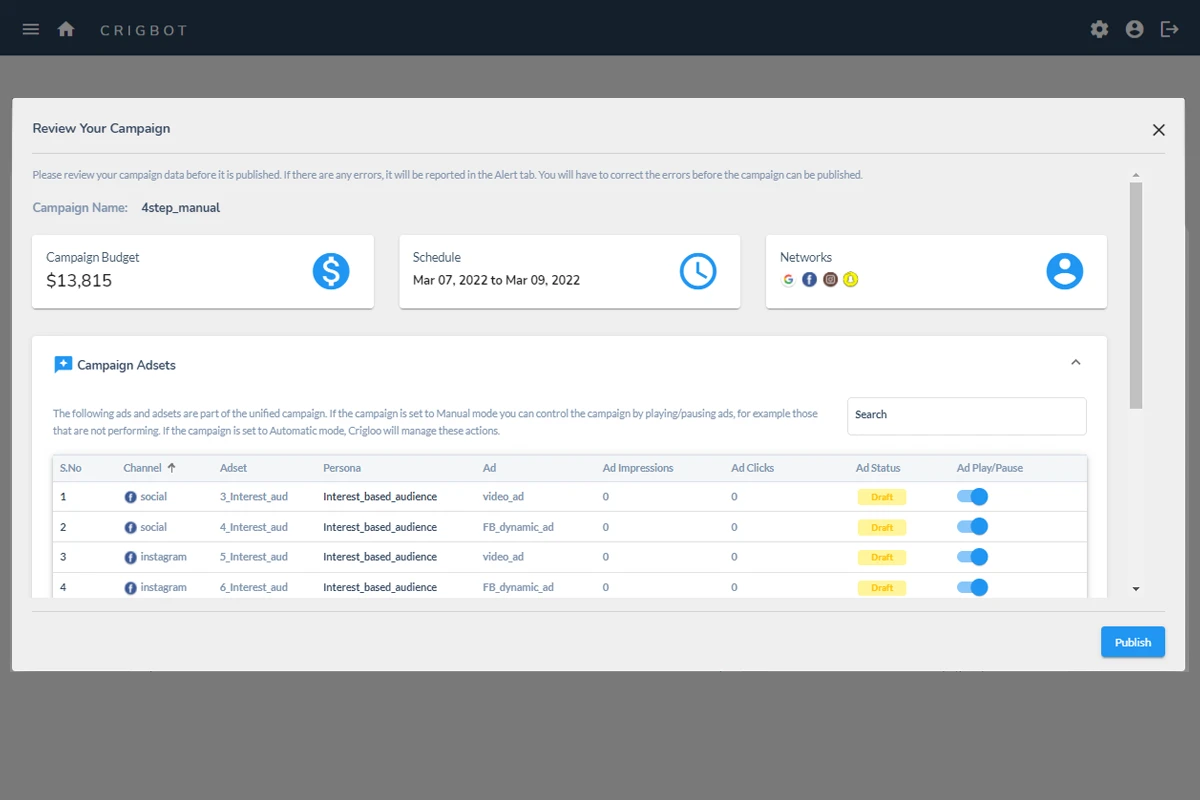
- The Publish button will publish the campaign in the respective ad networks. After the publish button is clicked, it can take up to 15 minutes for the campaign to be fully published in the ad networks. Occasionally, the campaign publish might get rejected by the networks and fail. Please contact Crigloo support at info@crigloo.com if this were to occur.
- Once published successfully, depending on the network it can take several hours for the campaign to start performing.
- Crigloo downloads campaign performance from the networks twice a day. The reports are available to be viewed in the Insights module.
4.4 Conversion Campaigns:
A Website Conversion Campaign in Crigloo can be used to execute campaigns which are focussed on achieving specific end goals as opposed to campaigns that generate awareness or traffic (leads). The end goal for example could be the purchase of products or services. An important aspect of these campaigns are that they are billed based on the number of conversions achieved instead of impressions or clicks.
Consider the following examples:
You run a training institute that is offering courses online. There are two online training courses that you want to promote in the coming months. Course 1 - Story Telling for Kids and Course 2 - Basics of Math for Children. The price of Course 1 is $1000 and Course 2 is $2000 per student.
You are willing to pay upto 25% of the course price to acquire the sales. Therefore the target cost of acquisition for Course 1 is $1000*0.25 = $250 and for Course 2 is $2000*0.25 = $500. In Crigloo you can set up two campaigns, one for each course with a target acquisition cost. Each time a purchase is made for these courses on your website, a conversion event will be fired.
| Campaign | Goal | Website Event | Target CPA |
| Campaign 1 | Purchase | Course 1 Purchase Button | $250 |
| Campaign 2 | Purchase | Course 2 Purchase Button | $500 |
Let us take another example - say a consulting firm that wants to generate inquiries. The firm is willing to pay $50 for each inquiry. There are three different ways a person can submit an inquiry through the website - through a form, by clicking on the contact me button or by sending an email from the website. Thus the campaign will be set up in the following manner.
| Campaign | Goal | Website Event | Target CPA |
| Campaign 1 | Lead |
|
$50 |
This campaign has one goal - Lead, but there are three events that can trigger this goal. Now each time any of the three events are fired, it will be considered as a conversion.
The following text explains how a conversion campaign can be set up.
Website Pixel Configuration
Before a Conversion Campaign can be run in Crigloo the following steps must be performed.
- Connect Crigloo to Ad Accounts. This step is performed from the Brand Configuration Screen Step1: Ad Account Setup. Skip this step if this has already been done.
- Configure the Website Pixel: This step can be performed from the Brand Configuration Screen Step 2: Website Pixel and Events Setup.
- Configure Remarketing and Conversion Tags: This is the last and final step of the configuration. In this step Crigloo will configure your ad account and GTM for running Conversion campaigns. To complete this step please proceed to Step 3: Remarketing and Conversion Setup part of the Brand configuration screen.
A website pixel is a small piece of code, resident in your website, that enables tracking of events. Tracking events is important for Conversion campaigns as they are the basis on which the campaigns are executed and billed. In this step both the pixel and events are configured.
For details on how events are configured please refer to5.3 Website Pixel Configuration
Launch Conversion Campaign
- Choose Website Conversion as the Campaign Objective.
- Provide the Campaign Goal:
- Provide the Campaign Budget
In step 3 of the Campaign creation process, specify the goal of this campaign. Goal has to be selected for each network. While you can specify a different goal for each network, we suggest that you select the same goal across networks so that the overall objective of the campaign is consistent.
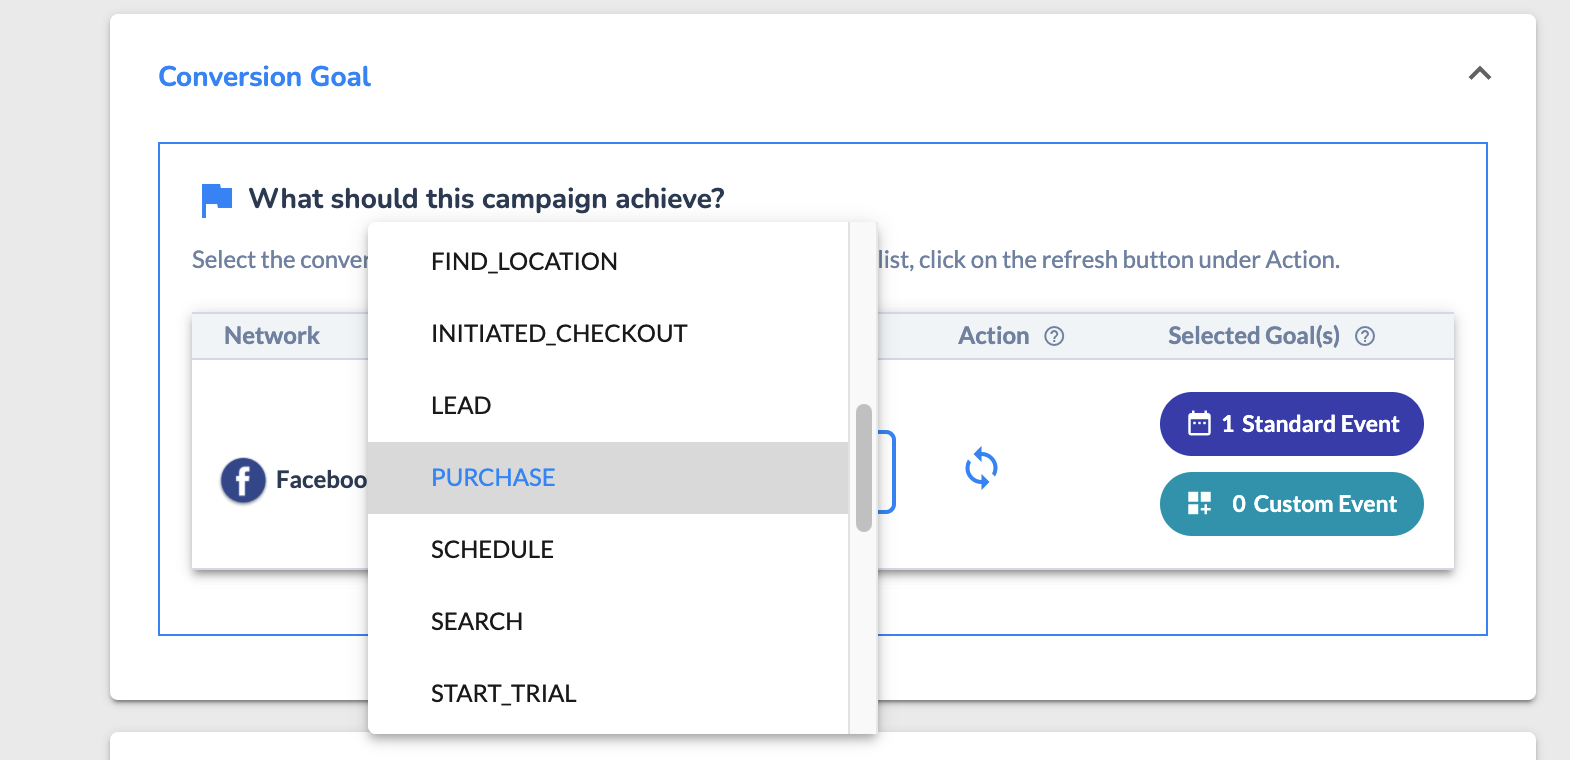
There are two types of goals. Standard and Custom. Standard goals are predefined by the ad networks - like Add to Cart, Purchase, Payment etc. Custom goals are defined when a goal is not part of the standard goal list. Goals are created in the Crigloo Website Pixel settings screen. (We also allow you to bring Goals that have been defined in Google and Facebook Ads).
Goals are tied to events that occur on your brand’s website. For example if the goal of the campaign is to drive online sales, the website event can be the clicking of the Purchase or Payment button. Each goal can consist of multiple website events. Events are particular website actions such as individual button clicks (button for purchase of Item1, Item2 etc) while goal is a collection of related events. Goals are also called Categories. Likewise Events are referred to as Actions.
Choose a daily budget for this campaign.
If you have chosen the Automatic mode, you will need to provide only the total daily budget. Crigloo will determine the budget for each of the networks chosen for this campaign.
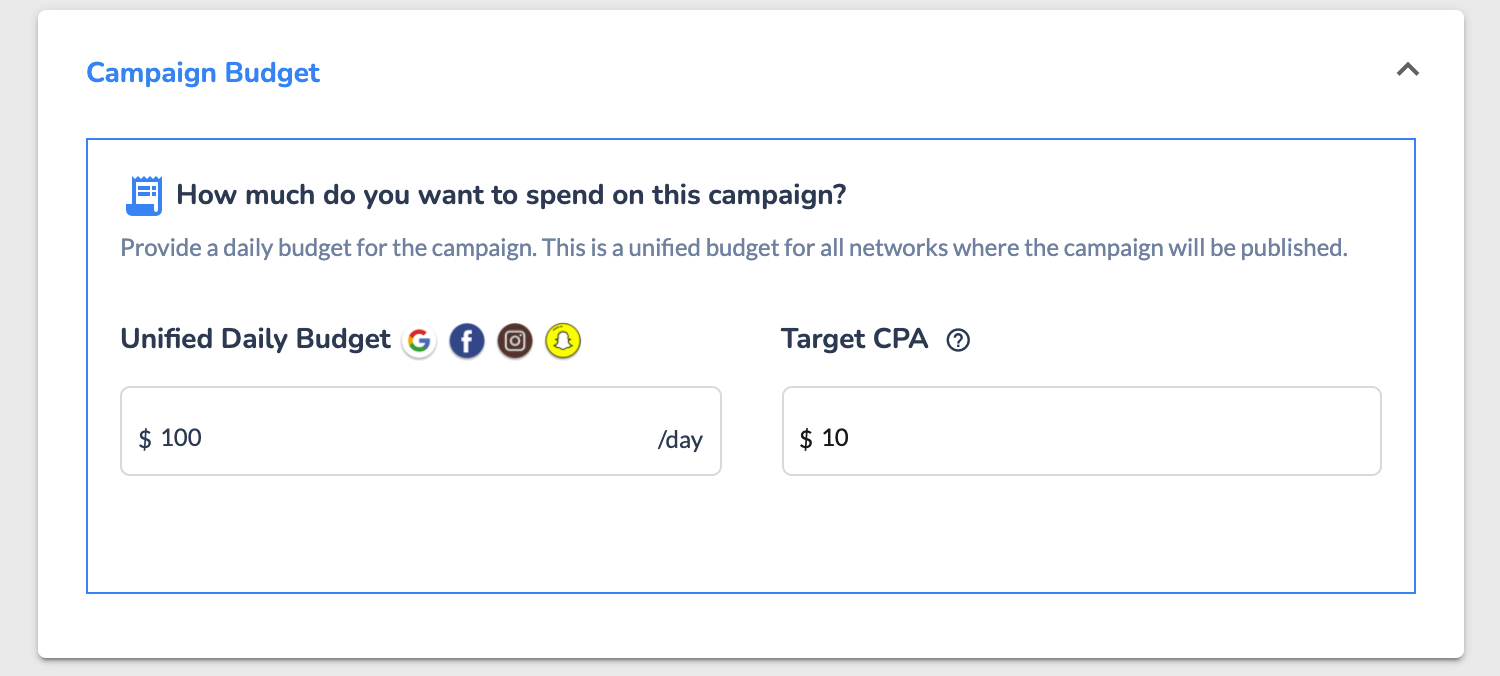
If you have chosen the Manual mode, you will have to provide the budget for each of the networks chosen. In the manual mode, you will need to provide additional inputs such as Billing Type, Bid Strategy and Target. Bid Strategy and Target together define how the ad networks will achieve the campaign objective. Some bid strategies such as Maximize Clicks and Highest Volume do not require Target value as they use automated algorithms. Others such as Manual CPC and Target CPA let you provide targets which the networks will have to achieve. Target based bid strategies can be relevant for conversion objective campaigns by letting you specify the average amount you are willing to spend for each conversion. Crigloo’s automatic mode uses auto bid strategies such as Maximize Clicks and Highest Volume except in the case of conversion campaigns for which a target value has to be provided.
Once the Conversion Goal and Campaign Budget inputs are provided, you can proceed to the next step of selecting the target audience and target message for this campaign.
4.5 Which fields are editable after publish:
Once a campaign is published certain fields cannot be edited. The restrictions are placed to maintain the integrity of the campaign. The following is the list of campaign inputs that can be edited.
- Campaign Budget, Bid Amount
- Campaign Date
- Campaign Conversion Goal Category for Google
- Add new Persona to existing Audience
- Add new Ads to existing Gallery
- Update Ad (except Google Static Ad)
- Update Ad Extension
- Update Fresh Prospecting Persona
- Pause/Play Ad
- Pause/Play Campaign
- Pause/Play Extension
5. Help - Settings
5.1 Prerequisites
Before the Crigloo system can be set up fully some steps have to be performed. This checklist will guide you through the steps. These are mostly one-time steps. If these steps are already done, proceed to Step 4.2.
Ad Accounts: While ad accounts are not essential to get started in Crigloo, you will need Ad accounts to publish campaigns. Also, you can start running campaigns with just one network in which case you will need access to only one ad account.
- Google Account - you will need a google account to do many of the steps mentioned below. If you do not have a google account, please create one from this link https://www.google.com/account/about/
- Google Ad Account - with your Google Account set up a Google Ads account. Follow this link if you need help - https://support.google.com/google-ads/answer/6366720?hl=en
- Facebook Page for your Business
- Facebook Ad Account - if you do not have a Facebook Ad account please create one from this link - https://business.facebook.com/
- Snapchat Ad Account - if you do not have a Snapchat Ad account please create one from this link - https://forbusiness.snapchat.com/advertising/getting-started
- LinkedIn Ad Account: if you do not have a LinkedIn Ad account please create one from this link https://www.linkedin.com/campaignmanager/new-advertiser
- Access to Youtube channel:
Website: A website is essential for web analytics, remarketing, and conversion campaigns.
- Website: A fully functional website.
- GTM - Permission to add Google Tag Manager (GTM) code to your website is necessary. If you do not have access, please forward the GTM script that you will generate to your website administrator.
Other:
- Search Console - Follow these instructions to set up Google Search Console - https://search.google.com/search-console/about.
5.2 Brand Configuration:
A brand in Crigloo signifies a logical grouping of campaign and performance assets. For most parts, a Crigloo brand is equal to a brand in an organization. For every brand in your organization, one brand in Crigloo has to be set up. Crigloo allows the creation of multiple brands. If your organization has only one brand, then you will just need one brand in Crigloo.
Each brand in Crigloo is connected to the following:
- Single Google Ads, Facebook Ads, Snapchat, and LinkedIn Ad accounts.
- Single Google Tag Manager Account
- One website pixel
Each brand in Crigloo consist of the following:
- Any number of Omni channel campaigns
- Any number of Ad Galleries
- Any number of Audiences
- Insights performance data
- Brand Currency
- A Daily digest report
When you sign up with Crigloo we automatically create the first brand based on the inputs provided by you on the registration page. However, you can modify the Brand configuration at any time. If you have more than one brand in your organization, you will need to create additional brands in Crigloo.
Brand Configuration: There are two parts to configuring a brand
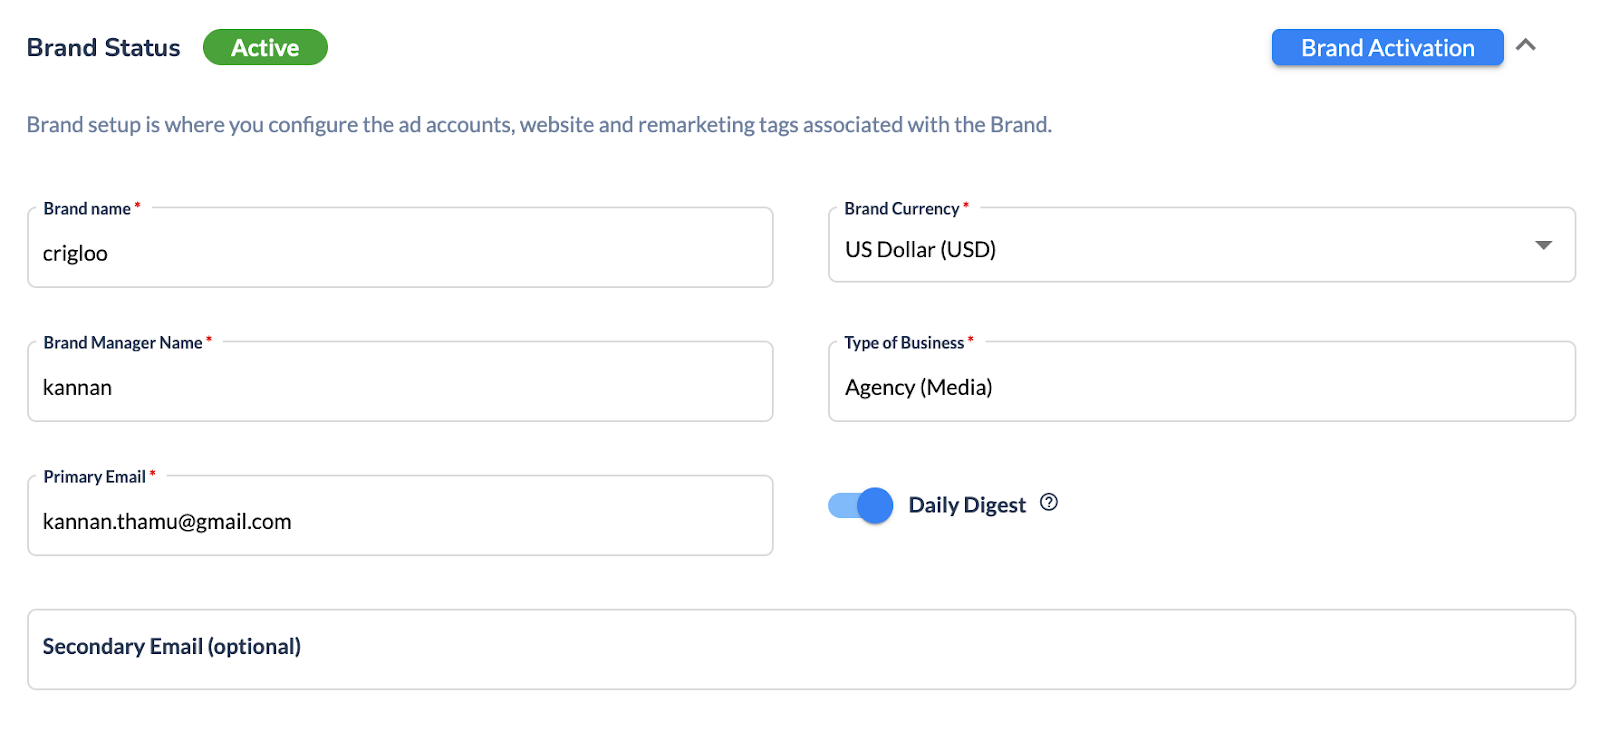
- Brand Status: Indicates whether the brand is active or inactive. Only active brands are available for use in Crigloo. While the user defines which brands are active and inactive, the number of active brands is defined by the Crigloo license purchased.
- Brand Activation: Here is where the status of the brand (active or inactive) is set.
- Brand Name: Name of the brand.
- Brand Currency: Currency for campaign publishing and performance reporting purposes. This value is independent of the Ad Account currency. If the brand currency and the Ad account currency are different, Crigloo will do the appropriate conversion.
- Brand Manager Name: Name of the brand manager.
- Type of business: Nature of business done by the brand.
- Primary Email: Primary brand contact details. A daily digest report will be sent to the Primary email address.
- Secondary Email: Secondary communication emails.
- Daily Digest toggle: To enable/disable daily digest emails.
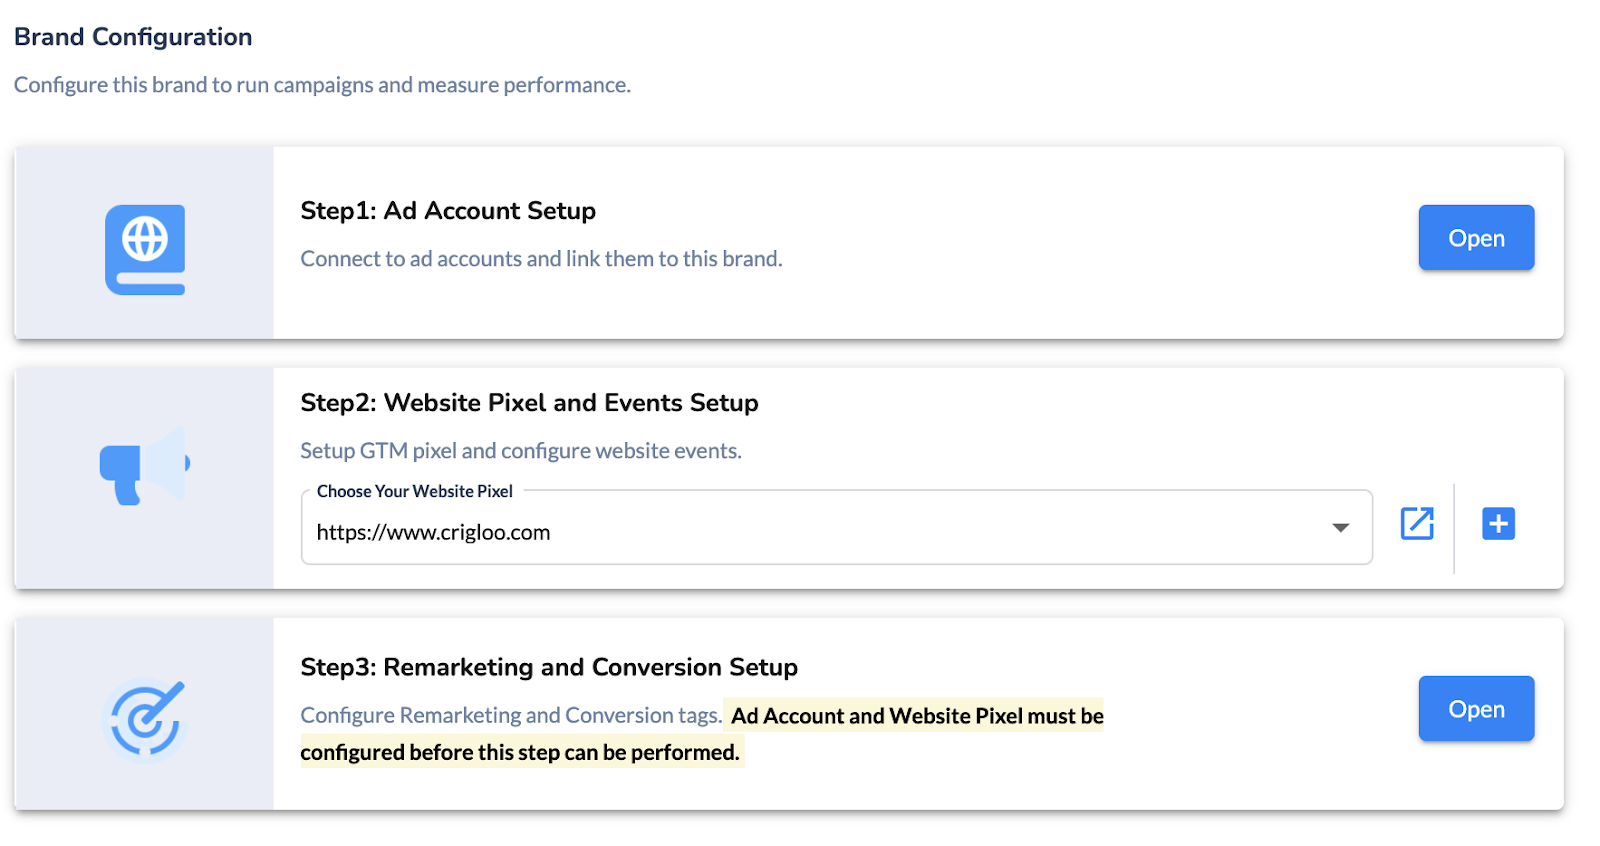
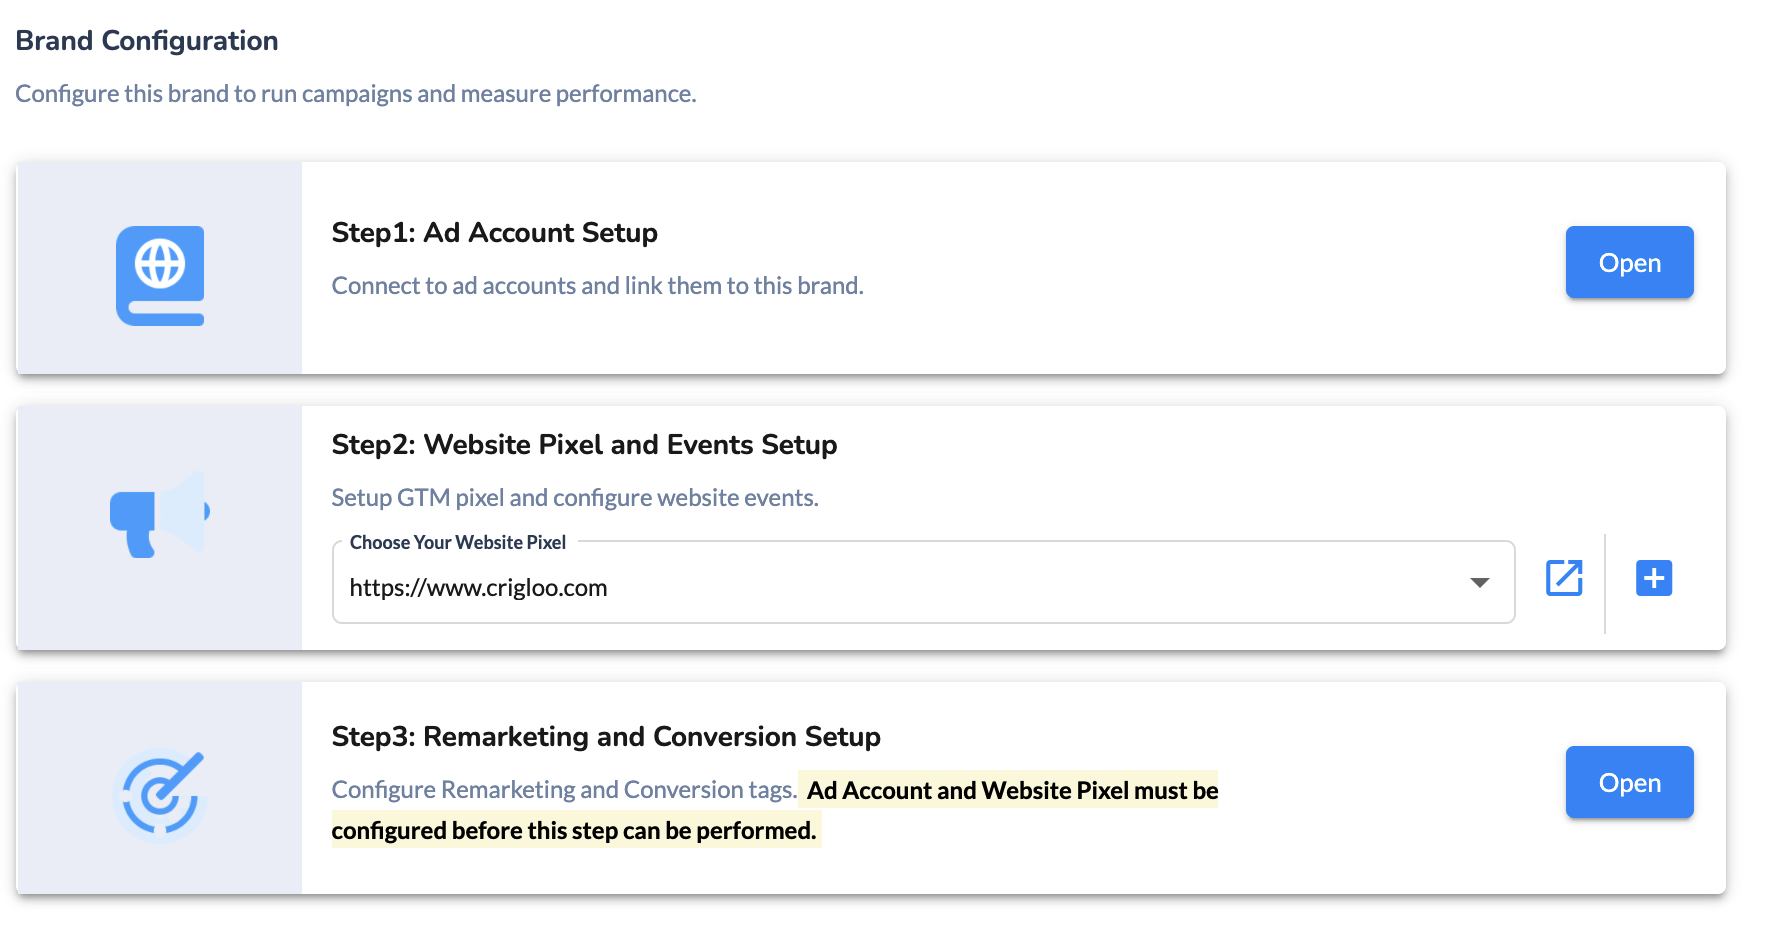
In Brand configuration, ad accounts and website tags are configured. The following are the three steps involved.
- Ad Account Setup: Click Open to view the Ad Account setup screen. Then connect to the respective Ad Accounts by clicking on View Connection. Once completed, select the ad account that should be linked to the brand. Only one ad account can be linked to a brand at a time. If an ad account is linked to a brand, the same account cannot be linked to another brand. This is done to maintain the unique relationship between a brand and its ad accounts. Ad account setup is required to launch campaigns in Crigloo.
- Website Pixel and Events Setup: In this step, web analytics tracking is set up. To configure a new website pixel, click on the + sign. If you have already created the website pixel, select the pixel from the dropdown.
- Remarketing and Conversion Setup: Optionally, you can create remarketing and conversion tags for the different Ad accounts that were linked in the previous step. Tags will be created for all the events defined in the website pixel. To create the tags please select the Update button. Please note that for the tags to be created, the Brand should have been linked to Ad Accounts and a Website pixel.
5.3 Website Pixel Configuration:
Crigloo is unique in the sense that it provides integrated Web Analytics. Crigloo can track data from source to destination on a website providing full-funnel performance reporting.
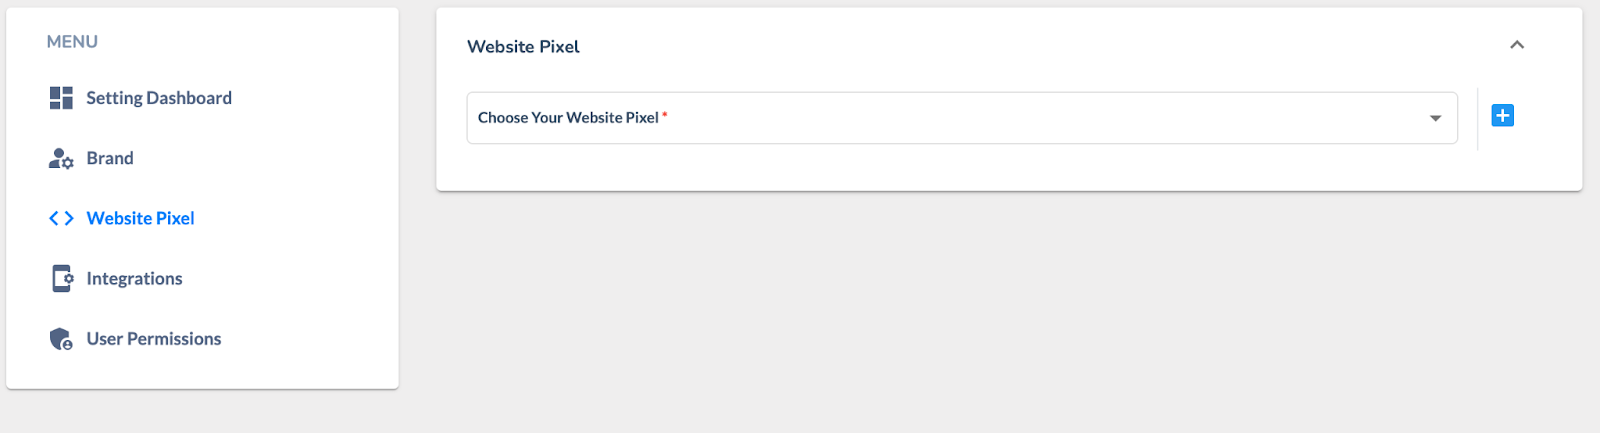
To create a new Website Pixel (or beacon), click the ‘+’ symbol. To edit an existing pixel, select the Website name from the drop-down menu. You can create multiple websites, one for each brand, in case your company has multiple brands.
Configuring Website Pixel:1. Once you click the + sign, you will be asked to connect Crigloo with a Google Tag Manager (GTM) Account. Crigloo uses GTM as its tag management system.
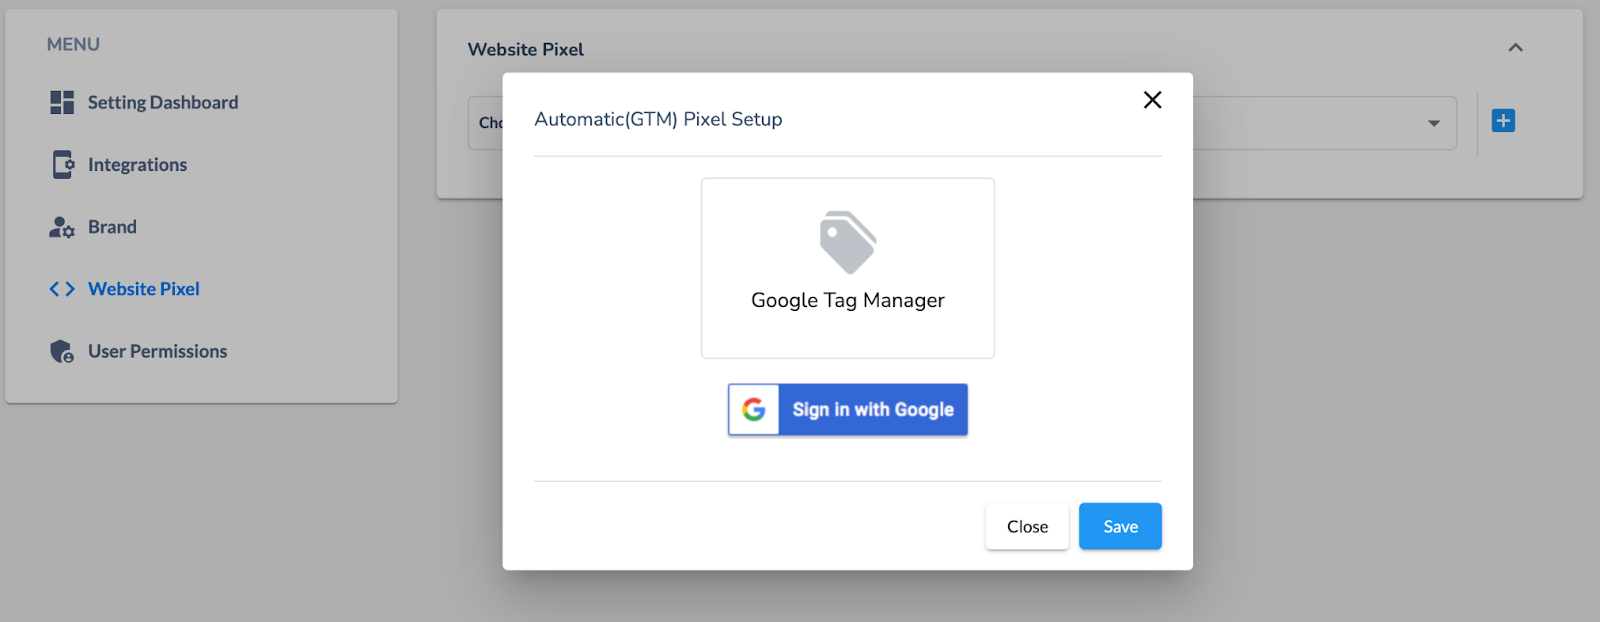
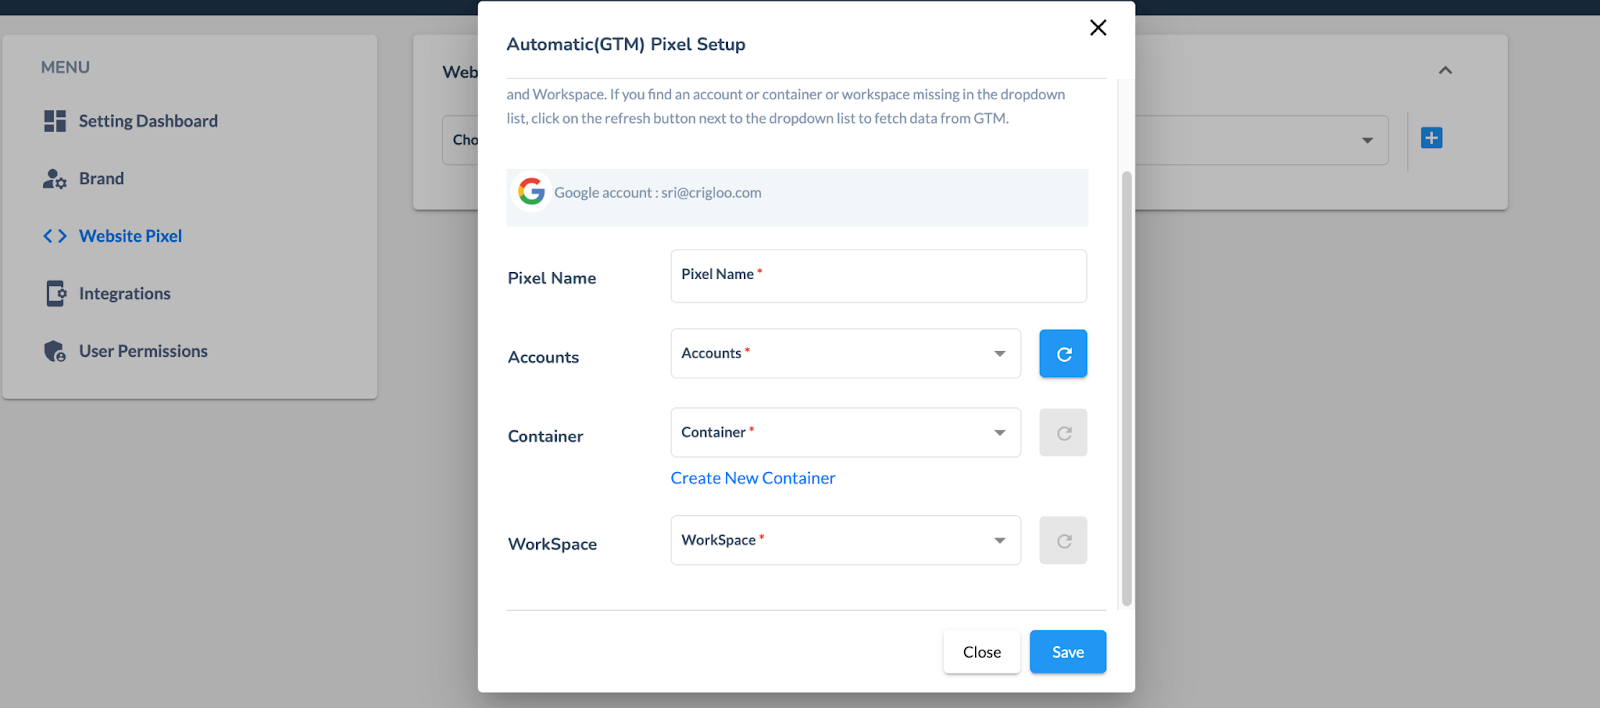
1. Once Google login is successful, the following screen will appear. Here you will provide will following details:
a. Pixel Name: The name of the pixel. You can also provide the name of the website.
b. Accounts: Select a GTM account. Click Refresh to obtain all GTM accounts linked to the Google login.
c. Container: Select an existing GTM container or create a new container. A GTM container is a logical datastore where website tracking instructions are saved. This datastore is then linked to a website using scripts. Crigloo will keep its tracking instructions in the GTM container selected. Click Refresh to obtain all GTM containers linked to the GTM account.
d. Workspace: Select the GTM workspace.
2. Once the GTM configuration is saved, the following screen will appear. It will show the GTM details, the most important of which is the GTM container code. This code has to be present on your website pages for tracking to happen. If you had chosen a container whose code is already present on your website then nothing needs to be done. Else the code has to be added to your website. This is only a one-time activity. After the code is embedded you are all set.
3.
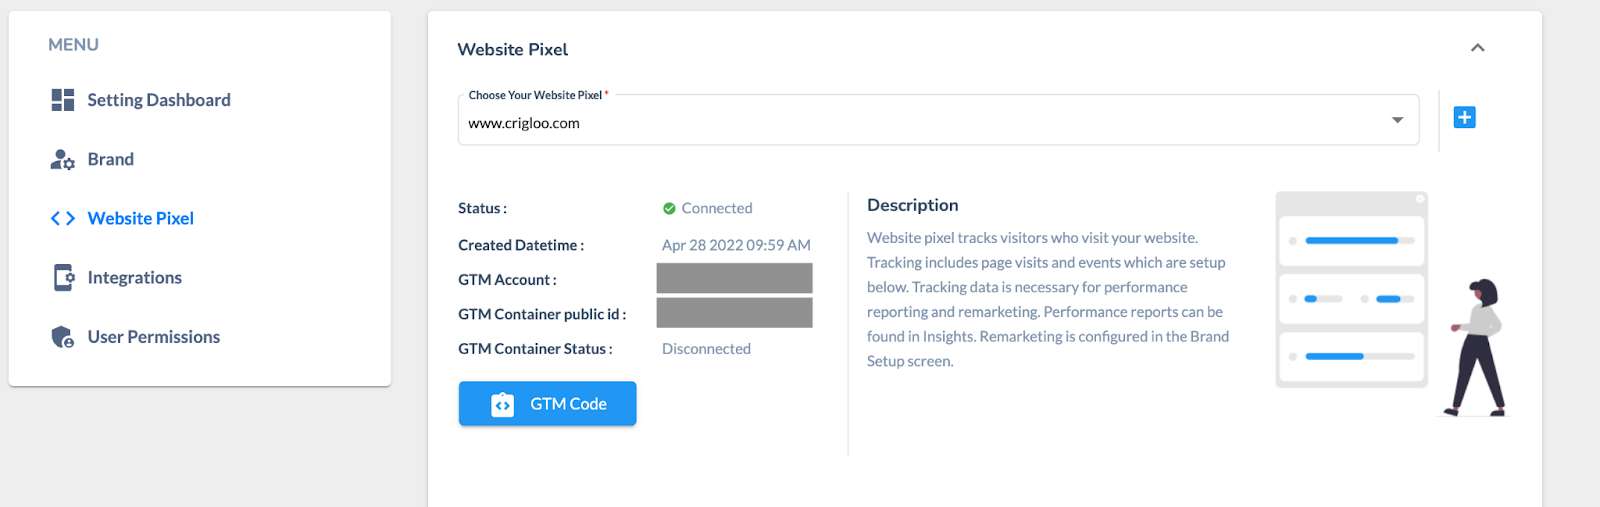
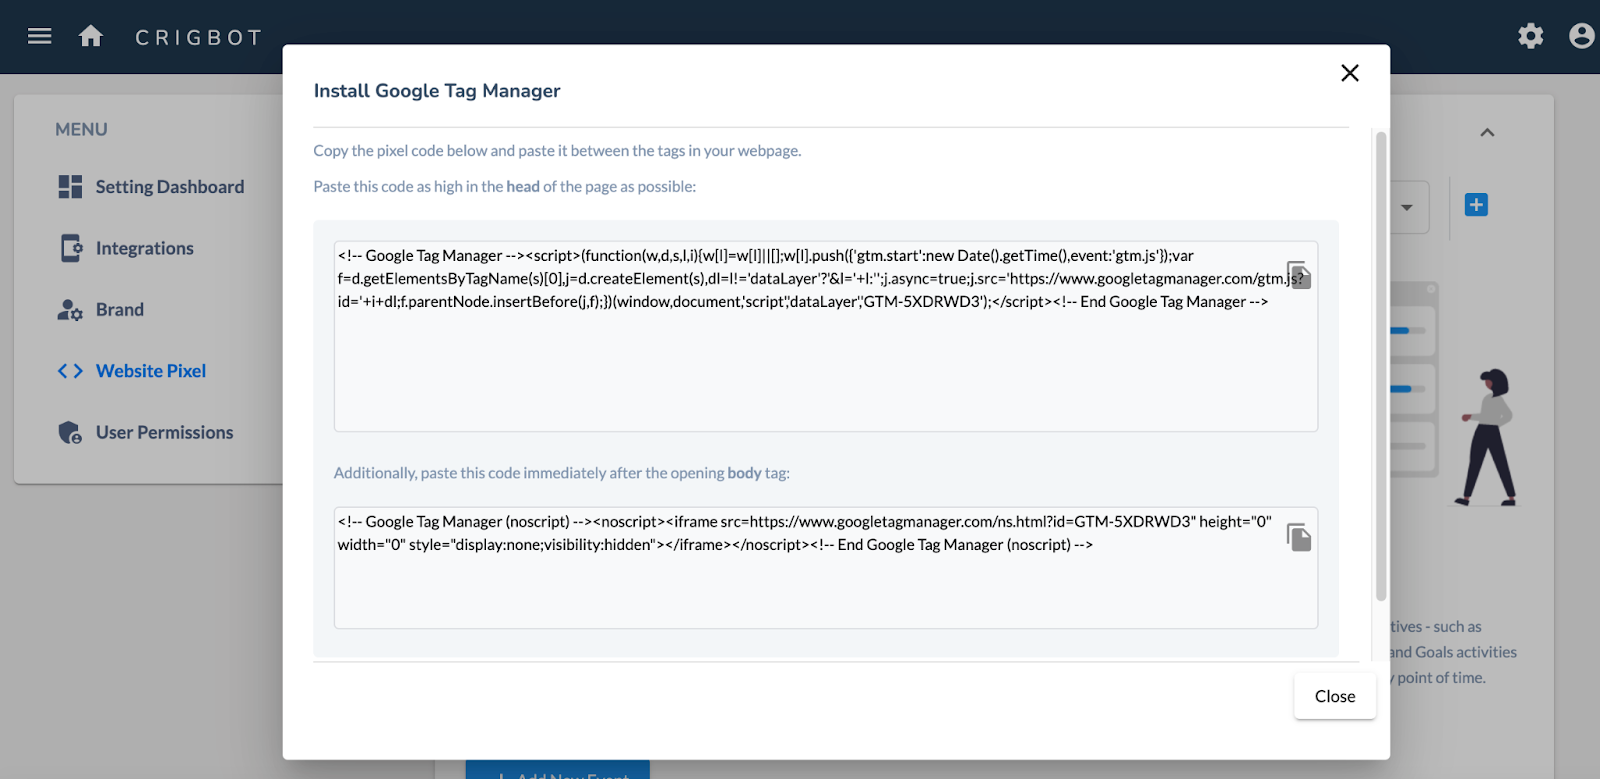
Clicking the icon next to GTM Container Code will open a window with instructions on how to insert the code into your website. Once the code is placed on the website, page-level tracking will automatically begin.
4. Optionally, in case you need to do advanced level tracking, events can be set up. Events are used for performance reporting, remarketing, and conversion goal purposes. Events for example are button click, file download, or form fill. To set up event-level tracking click on Add New Event and fill in the details.
a. Category: The category of event selected from the drop-down.
b. Event Name: Name given to the event
c. Trigger: Website visitor action which will trigger the event
d. Trigger Value: Condition under which the trigger will be fired.
e. Revenue: Notional amount assigned to the event. For example $1 for a button click, $2 for download, and #10 for form fill.
f. When to fire: Boundary conditions for the trigger to fire
g. Digest: This event performance should appear in the Crigloo Daily Digest report. Up to 5 events can be selected.
h. Goal: Whether this event is a goal, for example, a conversion action like clicking a purchase button.
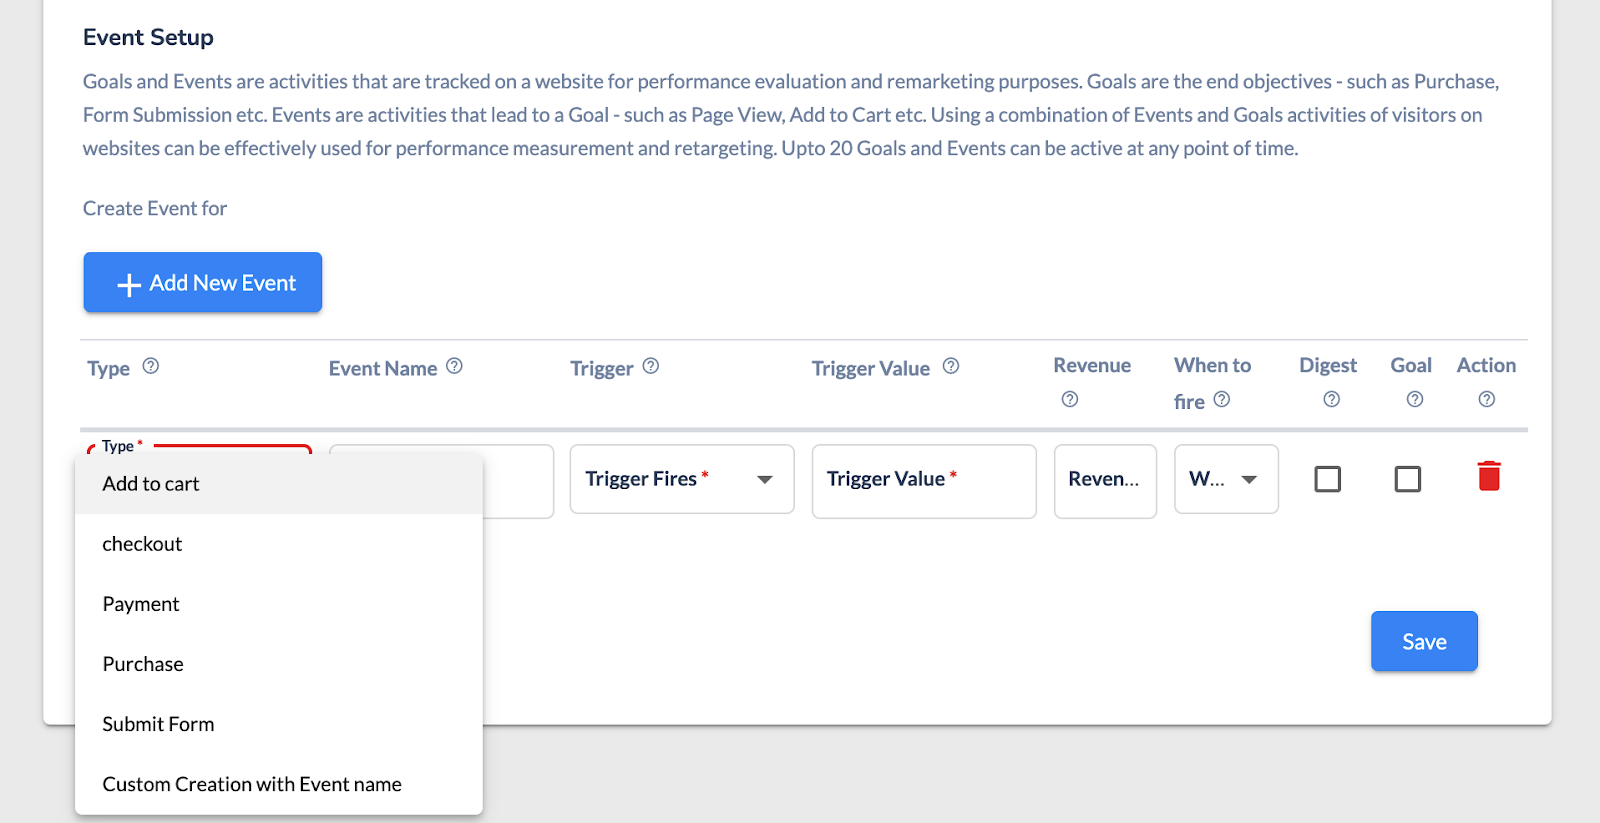
This completes the Website Pixel setup.
5.4 Integrations
Integrations allow you to link Crigloo with paid ads and free social media networks. The Integration menu is located under Settings. Select Edit Connections to connect to the networks.
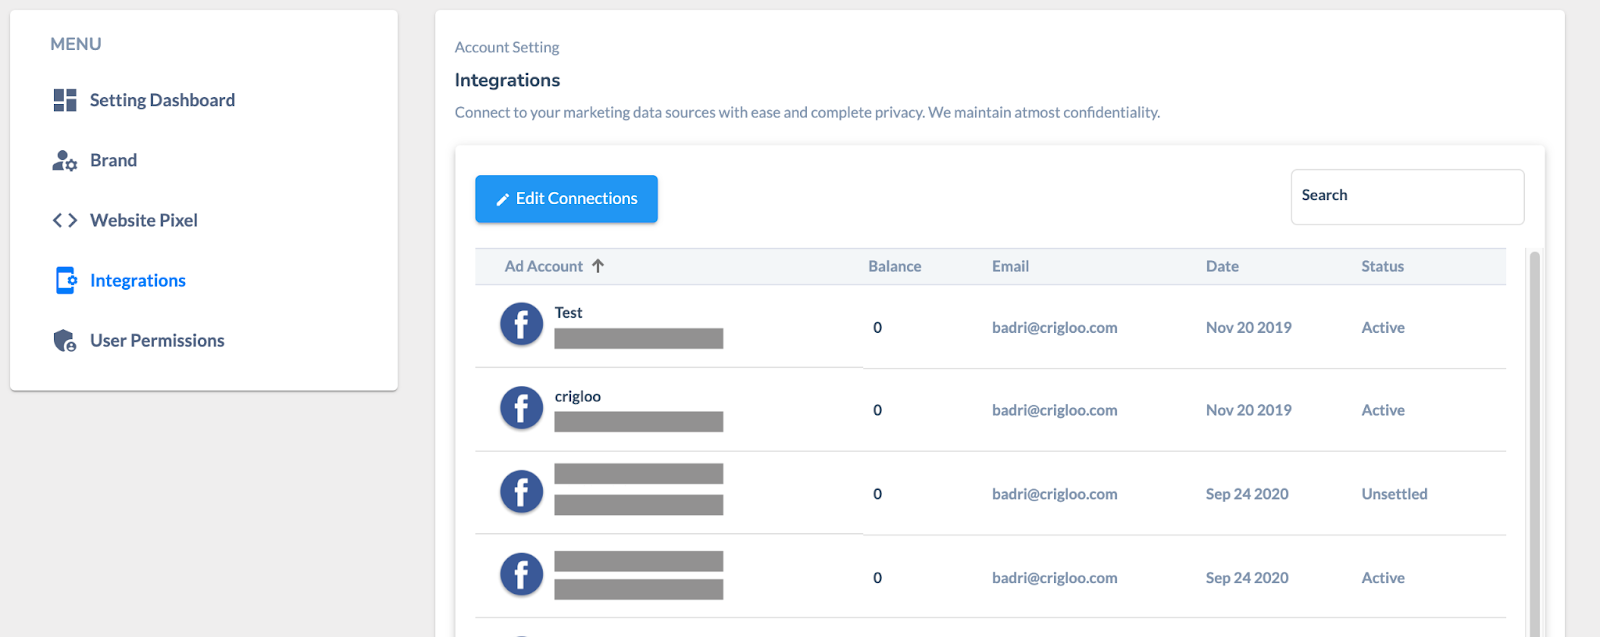
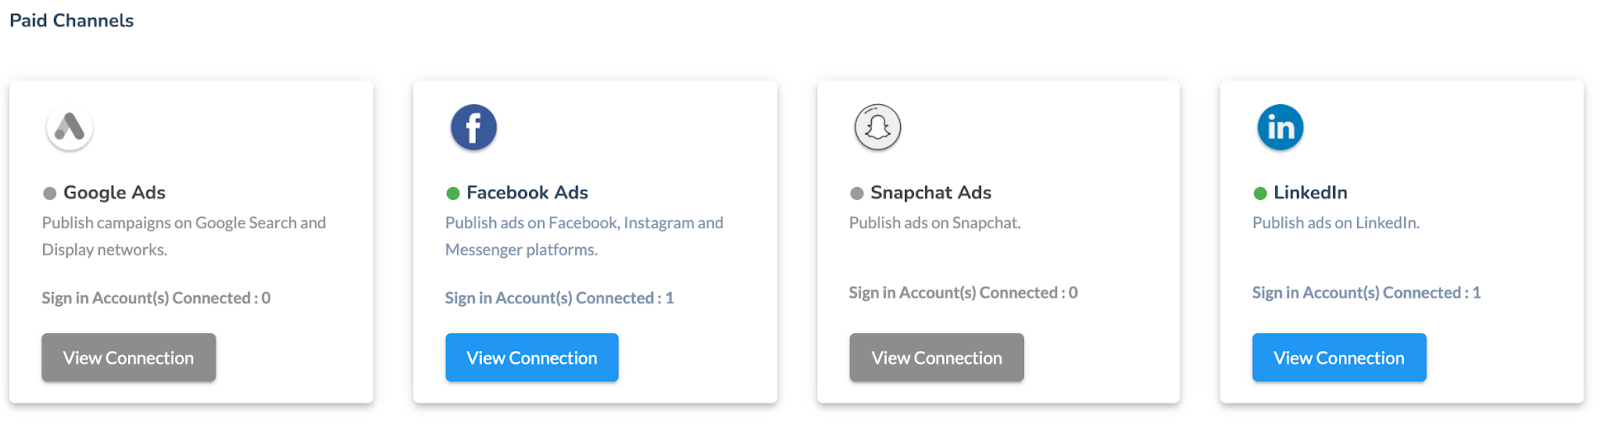
- Crigloo supports integrations with the following paid channels: Google Ads, Facebook Ads, Snapchat Ads, and LinkedIn Ads (performance reporting only).
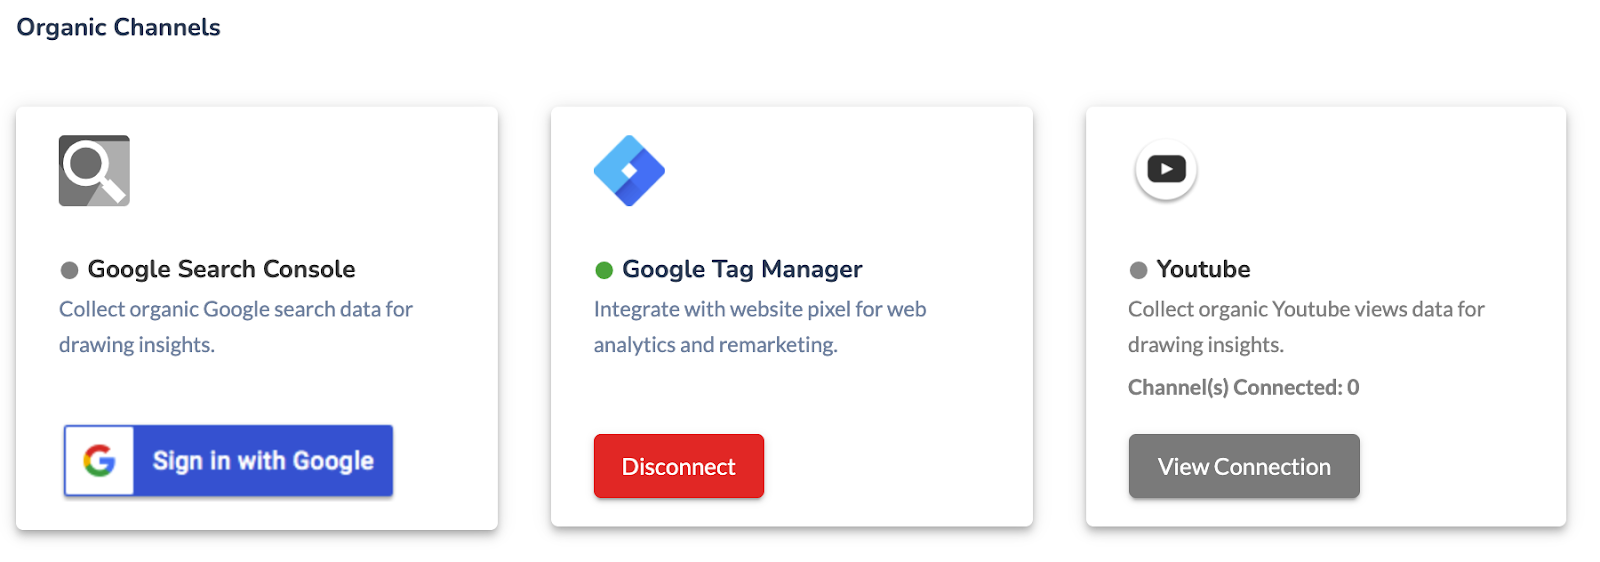
- The following organic channels can be linked with Crigloo:
- Linking Crigloo with the ad accounts will enable you to launch campaigns from Crigloo
- Linking Crigloo with ad networks and organic channels will download daily performance data from the respective networks.